Daily Guide for Everest
Explaining how to use Everest - Tenant Monitor, Smart Devices, Rooms
To understand the relationship between tenants, users, rooms, and plugs, refer to the System Hierarchy & Relationship page.
Tenant Monitor
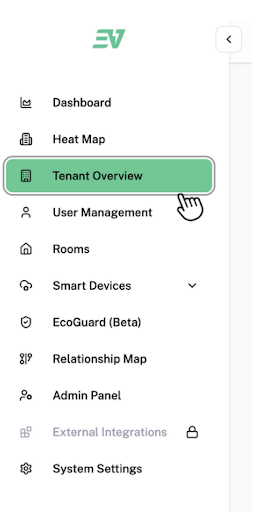
To access the Tenant Monitor, click on the “Tenant Overview” found in the side bar on the left side of the screen as shown on the left.
How to add a Tenant
This is the page that will be displayed on your screen. To add a Tenant, click “Add Tenant” located next to the search bar.

This is the pop up that will be displayed on your screen:
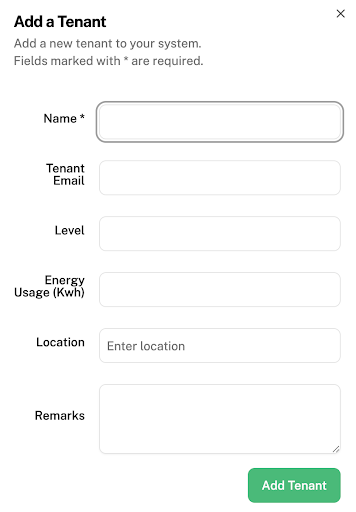
"Name" → enter the name you wish to label for one of your company’s branches. E.g. Company A – Pasir Ris Branch
"Tenant Email" → enter your email
"Level" (Optional) → enter the level your selected rooms, with Ecovolt plugs, are located on
"Energy usage (kWh)" (Optional) → can be left empty for now
"Location" → enter the address of your company’s branch (Location matters as it is synced to the Heat Map)
Click Add Tenant once completed.
How to Delete or Edit a Tenant
This is how it should look like after adding your desired tenant:

For quick action to delete or edit your tenant, click the 3-dot icon labelled as 2 in the picture above.
To access the Tenant Dashboard, press the tenant’s ID (in blue) labelled as 1 in the picture.
Tenant Dashboard
This should be displayed on your screen:
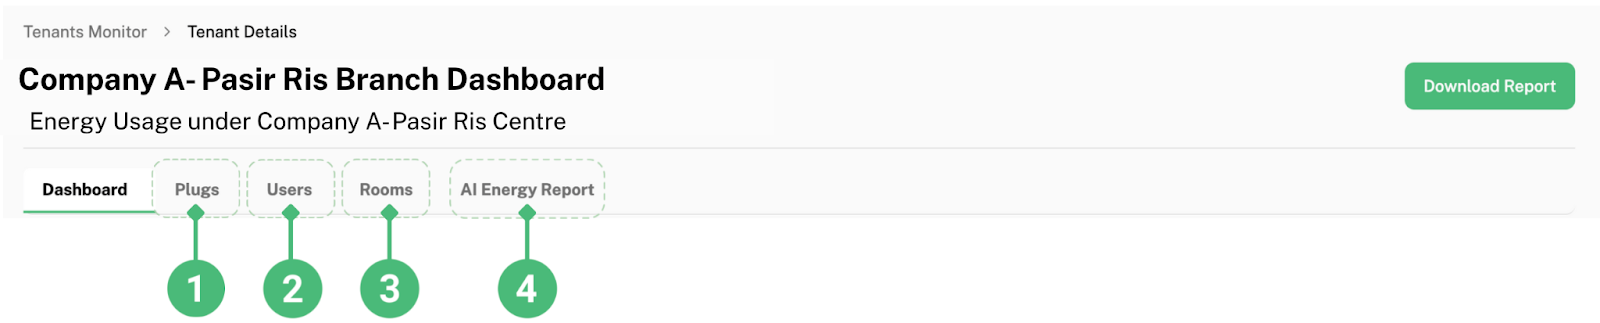
Under the Tenant Dashboard, you can view all the details of your tenant.
To access Tenant’s Plugs, click on “Plugs” labelled as 1 above. Here, you will be able to view all plugs under this tenant.
To access Tenant’s Zones, click on “Zones” labelled as 2 above. Here, you will be able to view all zones under this tenant.
To access Tenant’s Rooms, click on “Rooms” labelled as 3 above. Here, you will be able to view all rooms under this tenant.
To access Tenant’s AI Energy Report, click on “AI Energy Report” labelled as 4 above.
How to Generate a Report
To generate a report, press “Generate AI Report” & Save the report.
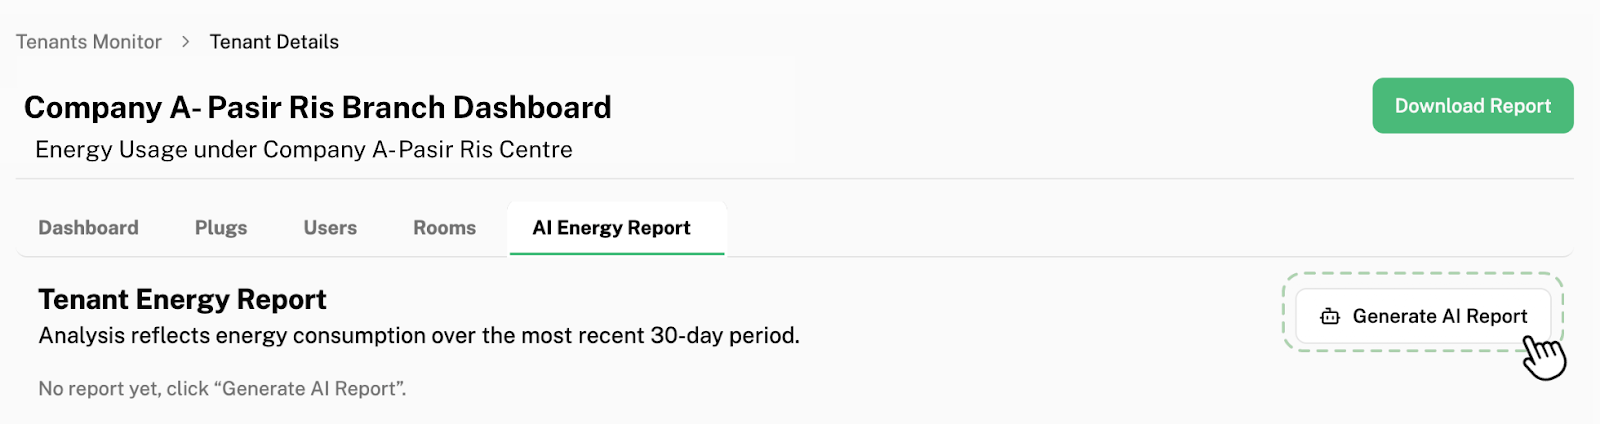
This automatically generates a 30-day report. This report can be downloaded into a docs and edited to be referred back to in the future.
This report includes:
- Executive Summary
- Consumption Analysis
- Usage Trends
- Improvement Suggestions
- High-Load Device Highlights
- Anomaly Detection
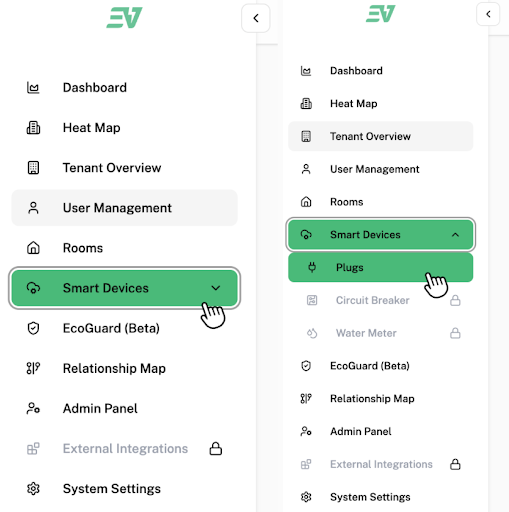
Smart Devices
To access smart devices, click “Smart Devices” found in the side bar. All smart systems connected to your System are found here.
How to Access Plugs
To access plugs, click “Plugs” found under “Smart Devices”.
 This is the page that will be displayed on your screen:
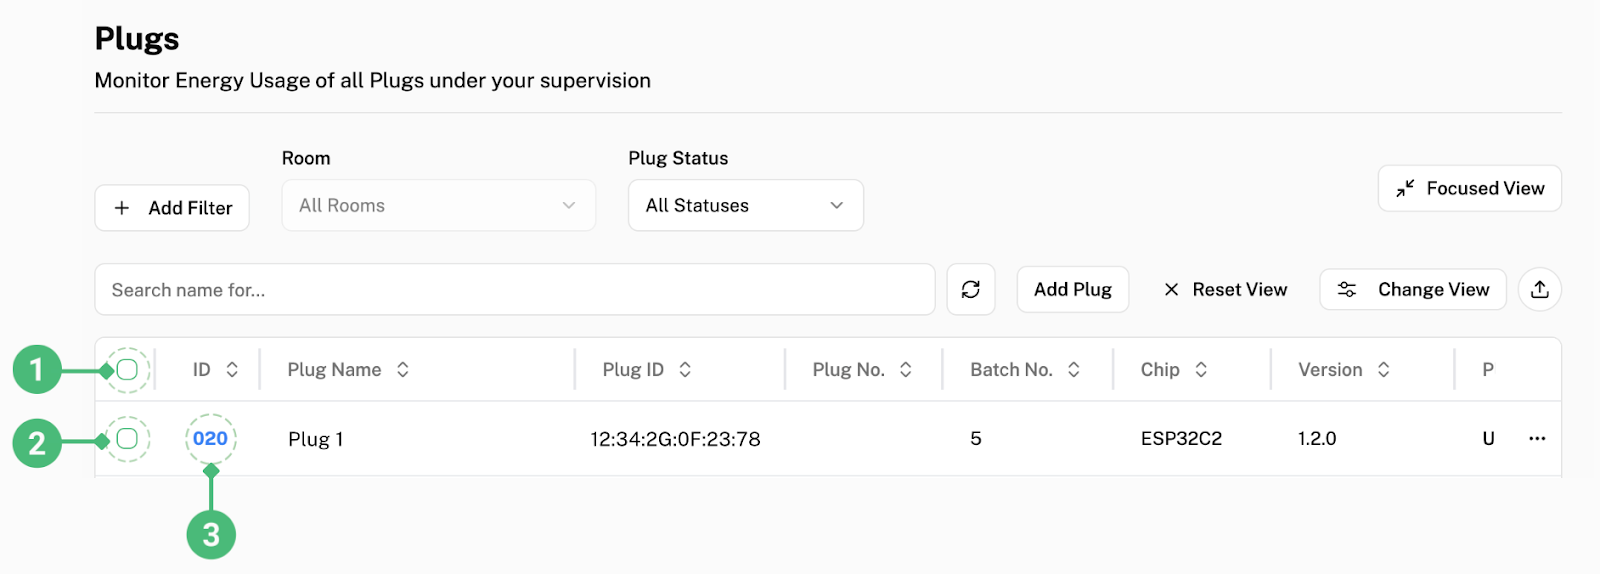
To select all plugs listed, click the check box labelled as 1.
To select a specific plug, click the check box next to the plug you want to select, as shown above in the checkbox labelled as 2.
How to Access Plug Dashboard
To access the Plug Dashboard, click the plug’s ID (in blue) labelled as 3 in the picture. Under the Plug Dashboard, you can view all the details of your plug.
After clicking 3, you will be brought to this page:
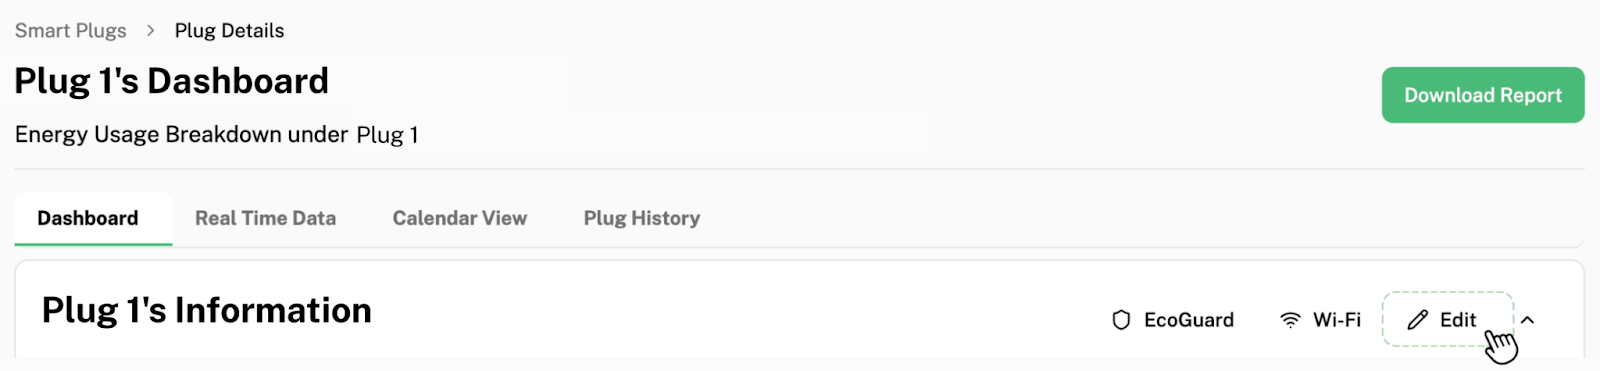
How to Edit Plug Information
To edit the plug's information, click "edit". This pop-up will be displayed on your screen:
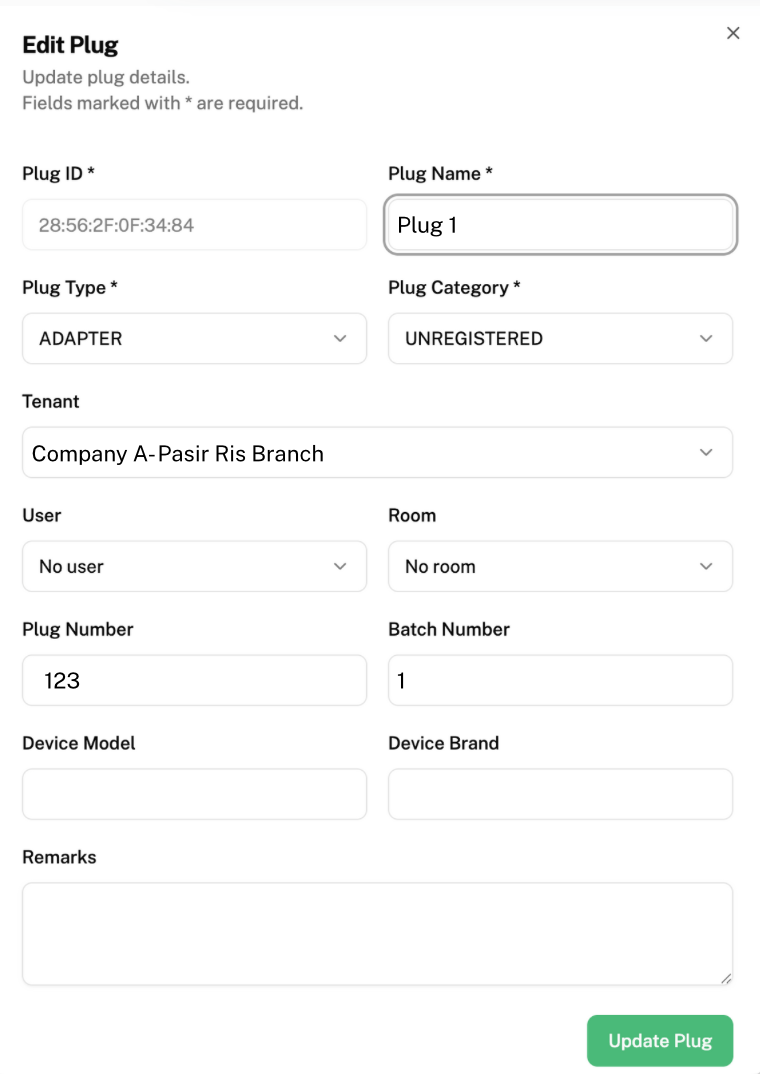
"Plug Name" fill in what you want your plug to be labelled as
Click on "Plug Type" and select the plug type that corresponds with your plug
Click on "Plug Category" and select the type of device your plug is connected to*
Click on "Tenant" and select the tenant your plug is found in (Optional)
Click on "Zone" and select the zone your plug is under (Optional)
Click on "Room" and select the room your plug is found in (Optional)
"Plug Number" and "Batch Number" can be left as it is (Optional)
"Device Model" fill in the model of the device your plug is connected to (Optional)
"Device Brand" fill in the device model of the device your plug is connected to (Optional)
*Even though “Plug Category” is Optional, we recommend you to categories your plugs, as you will be able to have a better view of how many plugs are under each type of device in your system. This can be seen under “Device Breakdown” as shown below for example.
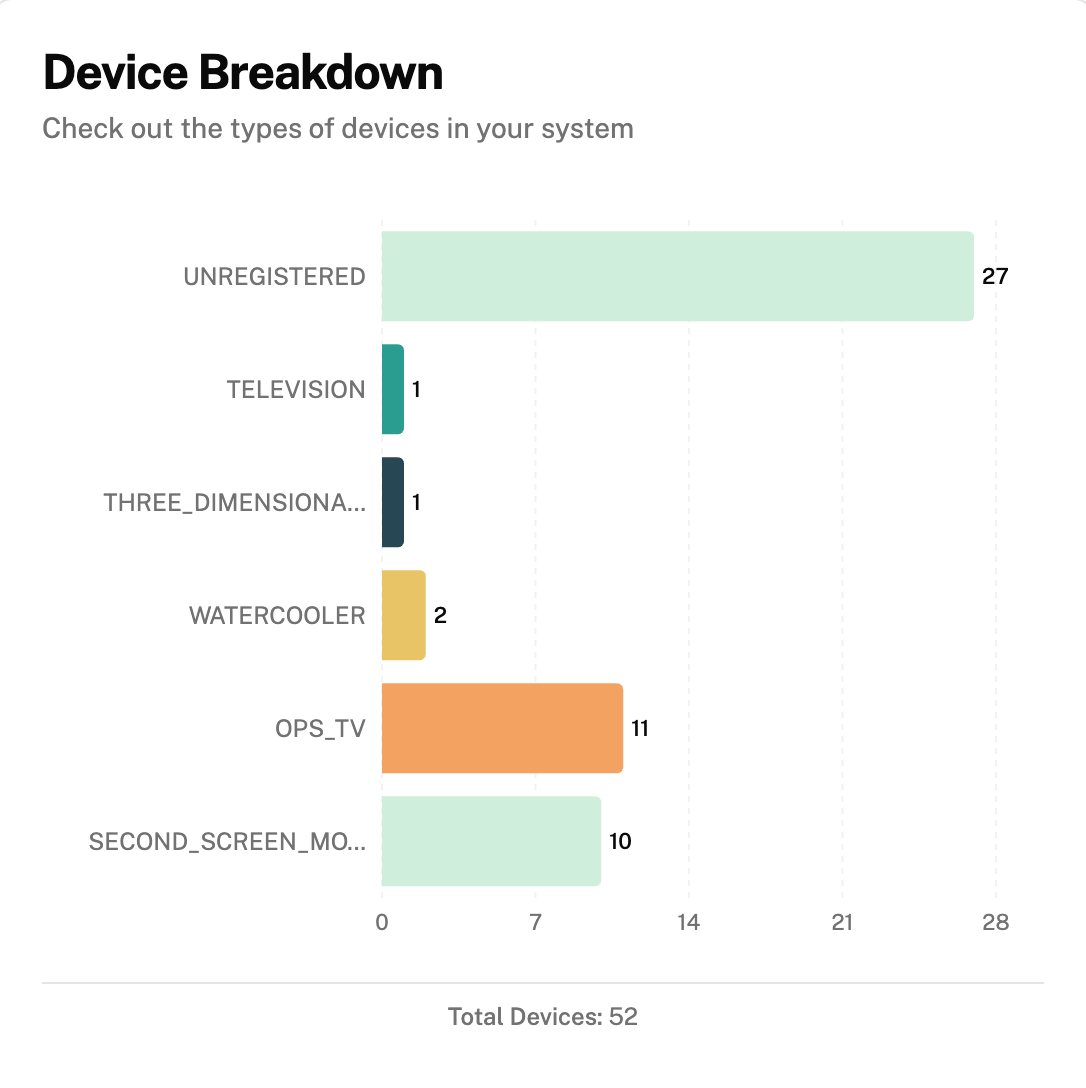
To view “Device Breakdown”, click on “System Dashboard” in your side bar.
How to Power On/Off a Plug
After selecting your desired plug(s), these options will be displayed on the bottom of your screen

To turn on or turn off the power of your selected plug(s), click on “Power ON/OFF” labelled as 1.
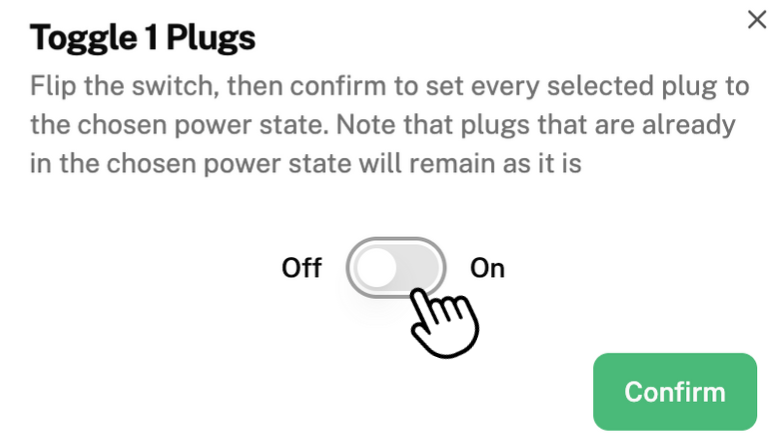
This pop-up will be displayed on your screen. Click on the white button and press “confirm” to turn on the plug(s).
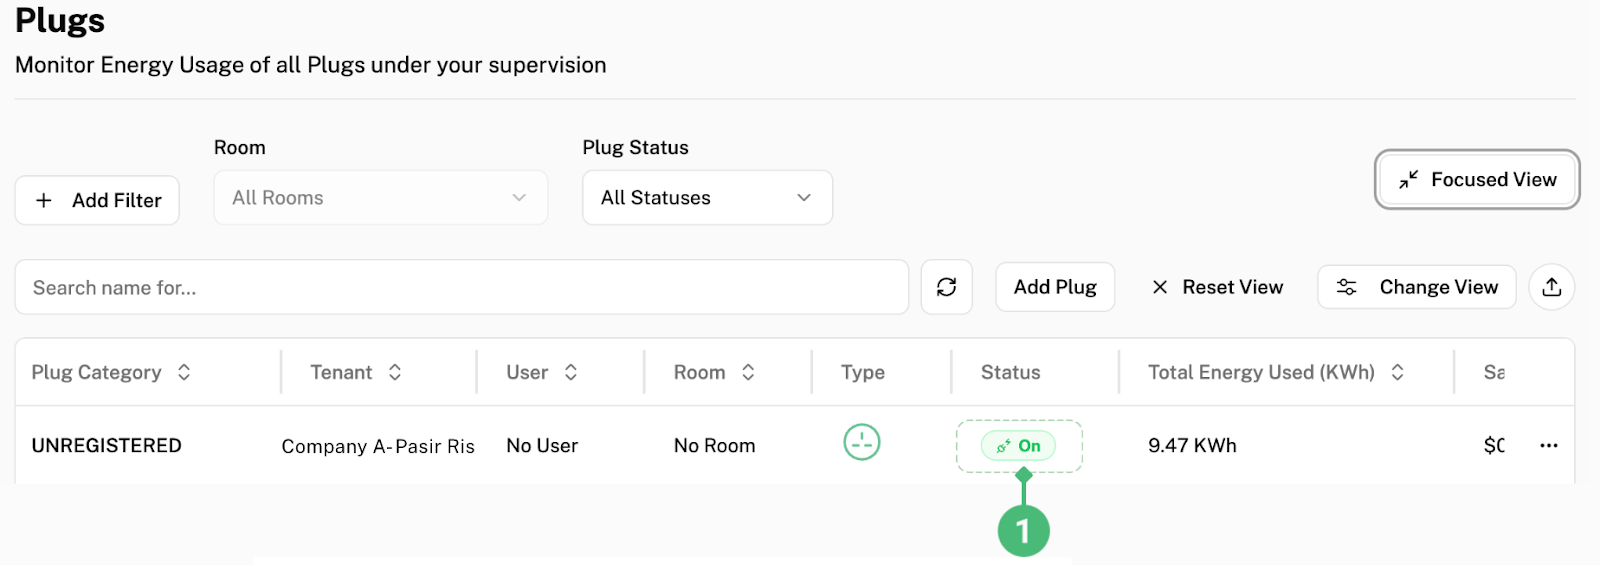
To confirm whether your plug(s) are on, you can double check that the status of the plug(s) is “On” as shown in the dotted box labelled 1.
How to Change the Wi-Fi of a Plug
To change the wifi of the plug(s), click “Send Wi-Fi Configuration” labelled as 2.
Ensure the plug is turned on and connected to the Wi-Fi (light of plug is on and not blinking) to receive the changing to Wi-Fi credentials.
This is the pop-up that will be displayed on your screen:
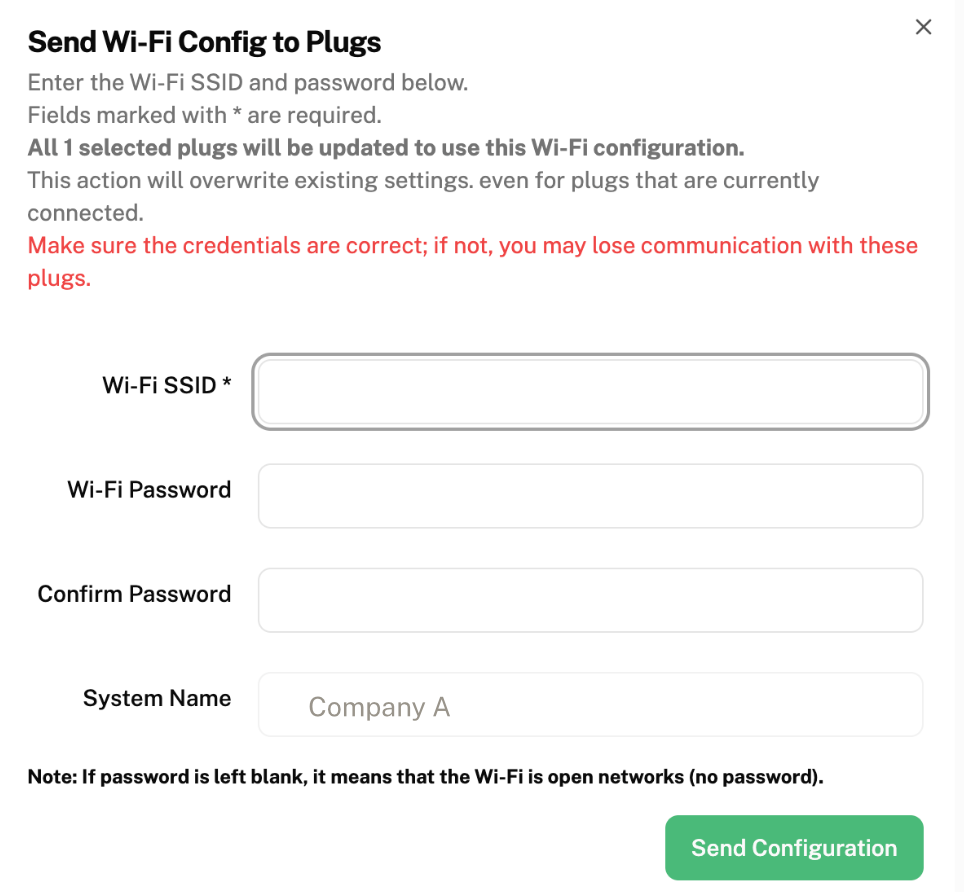
“Wi-Fi SSID” fill in the Wi-Fi name you want to change your plug(s) to
“Wi-Fi Password” fill in the password of the Wi-Fi you entered in “Wi-Fi SSID”
“Confirm Password” renter the same password
“System Name” will already be entered for you as your company’s name, you can leave it as it is
Click on “Send Configuration” to confirm the change of Wi-Fi
Everest will push the new Wi-Fi configuration to all connected plugs. During this process, the plugs’ indicator lights will blink as they attempt to connect to the new network. Once successfully connected, the blinking will stop and the indicator light will remain steady.
How to Set a Scheduled Timer for a Plug
Watch the Setting Up a Device Schedule demo video for a walkthrough.
Note: Only set a scheduled timer after 14 days of the first installation of Ecovolt smart plugs.
To set a scheduled timer for when your plug(s) will automatically turn on and off, click on “Set Scheduled Timer” as labelled as 3.
This is the pop-up that will be displayed on your screen:
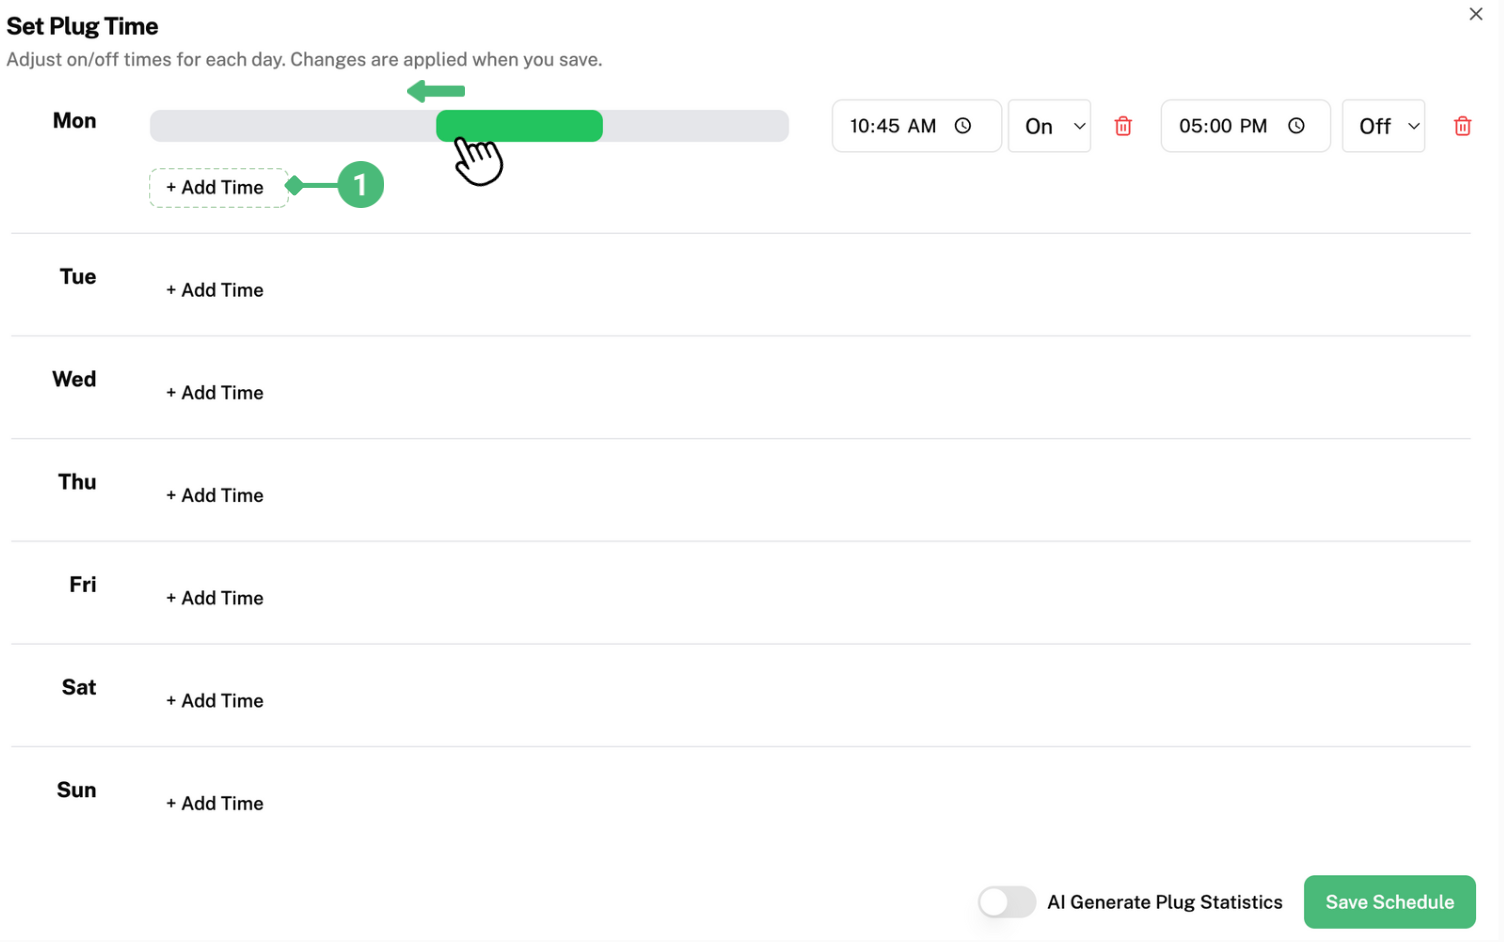
To set a timer, click on “Add Time” labelled as 1. The grey bar will appear. Here, you can click and drag the green bar left and right until you acquire your desired timing. For example, the picture above illustrates the green bar being dragged to the right, so that the plug will be turned on at an earlier timing. The green bar represents the duration the plug is turned on for.
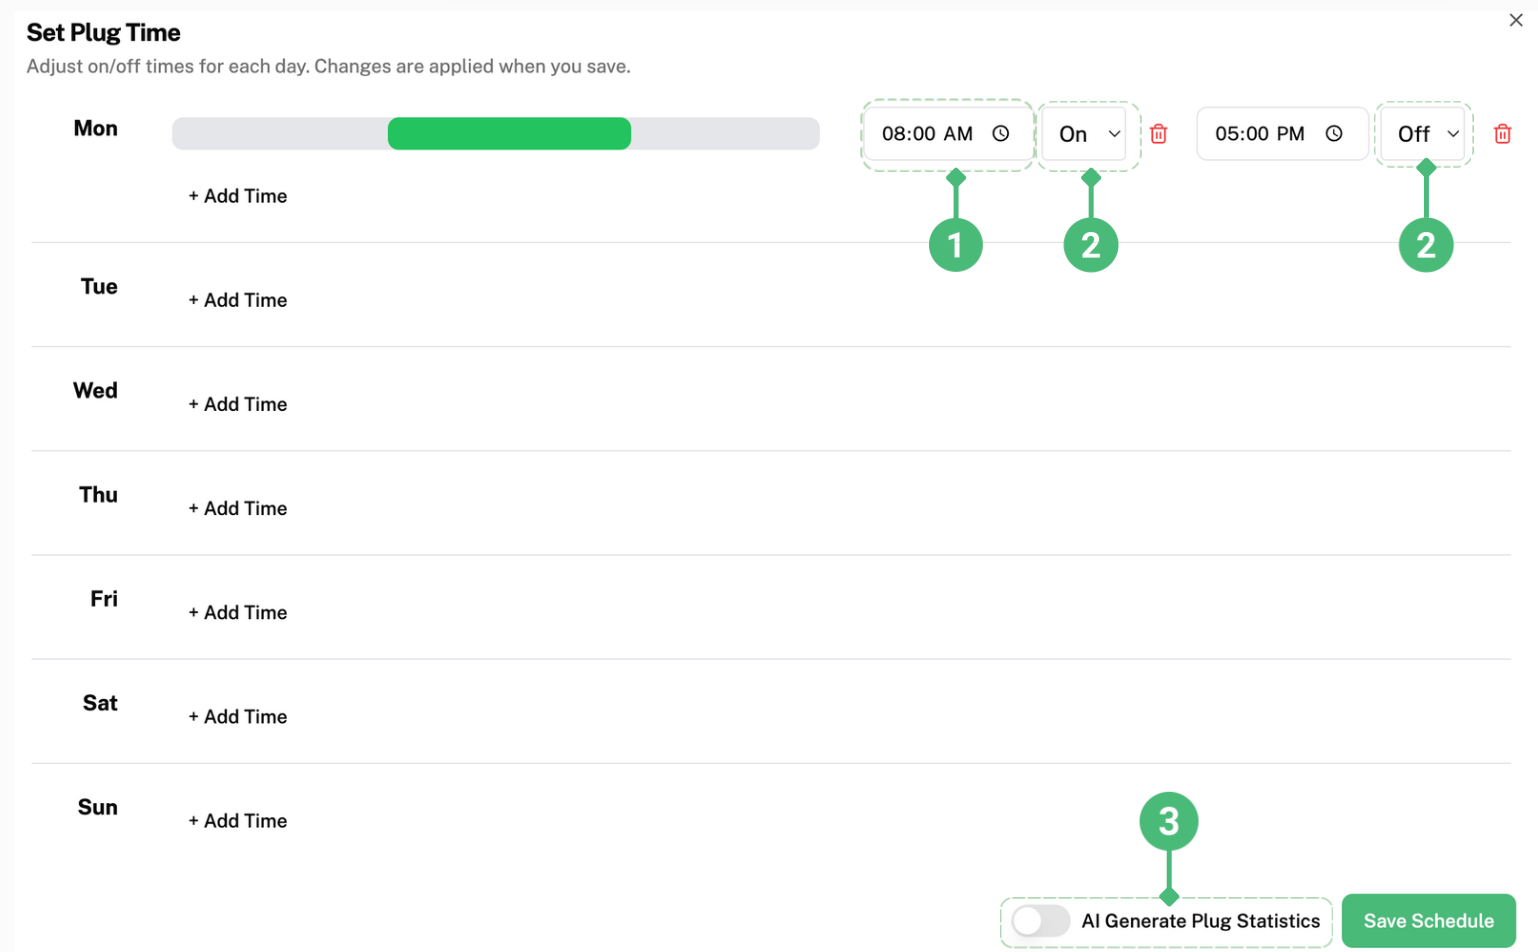
After dragging the green bar to the right, the starting time has been changed from 10 45am to 8am as shown in label 1. You can decide which time you want the plug(s) to be turned off or on by clicking on the boxes labelled 2. Typically, users set the plugs to be turned on during office hours. For example, setting the plugs to turn on at 8am and turn off at 5pm from Monday to Friday, while not setting a time for Saturday and Sunday, so the plugs will not be turned on as the office is not in use.
After finishing setting your desired timings, click “Save Schedule” to save your schedule in the software.
”AI Generate Plug Statistics” labelled as 3 is the Ascent Schedule feature — Ascent AI analyzes your past usage history to recommend an optimal schedule. Watch the Ascent Schedule demo video for a walkthrough.
To edit the relationship between Tenant, Room and Plug, click “Edit Relationship” labelled as 4.
How to Edit the Relationship Within the System
This is the pop-up that will be displayed on your screen:
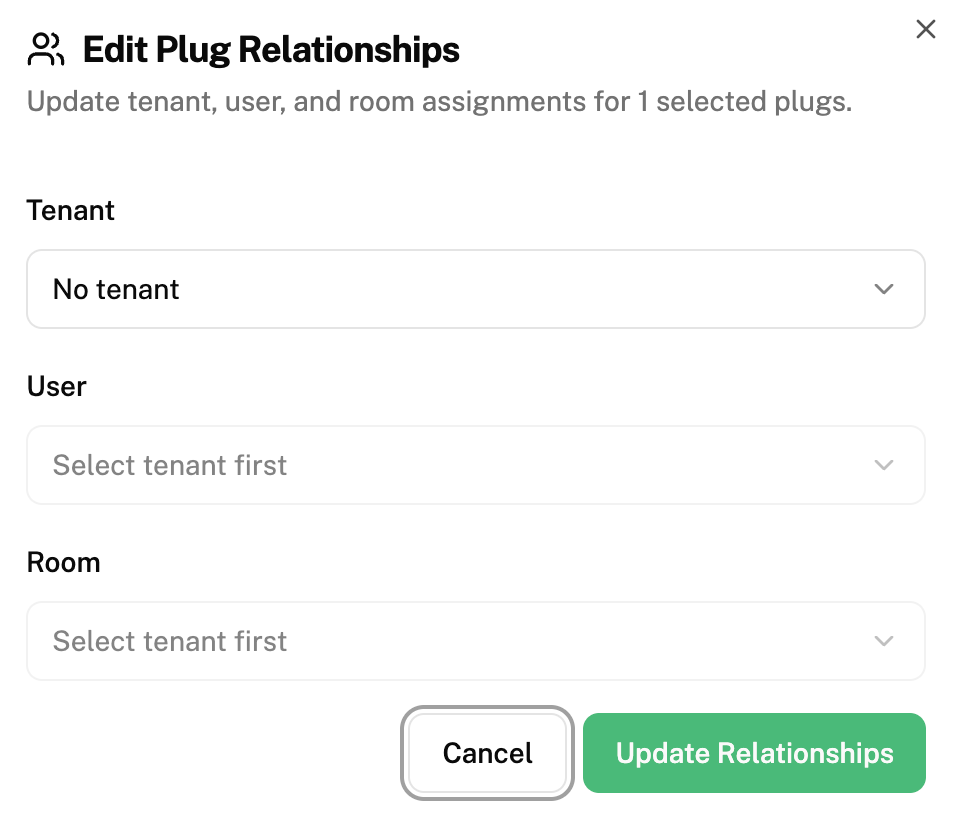
Click on “Tenant” and select the tenant (branch/location/outlet) you wish to change the plug(s) to
Click on “Zone” and select the zone you wish to change the plug(s) to
Click on “Room” and select the room you wish to you wish to change the plug(s) to
Click “Update Relationships” to confirm this change and save it in software
How to Download a Report
To download a report of your plug(s), click on “Download Report” labelled as 5.
This report includes:
- Hourly energy usage breakdown
- Daily energy usage breakdown
- Weekly energy usage breakdown
- Monthly energy usage breakdown
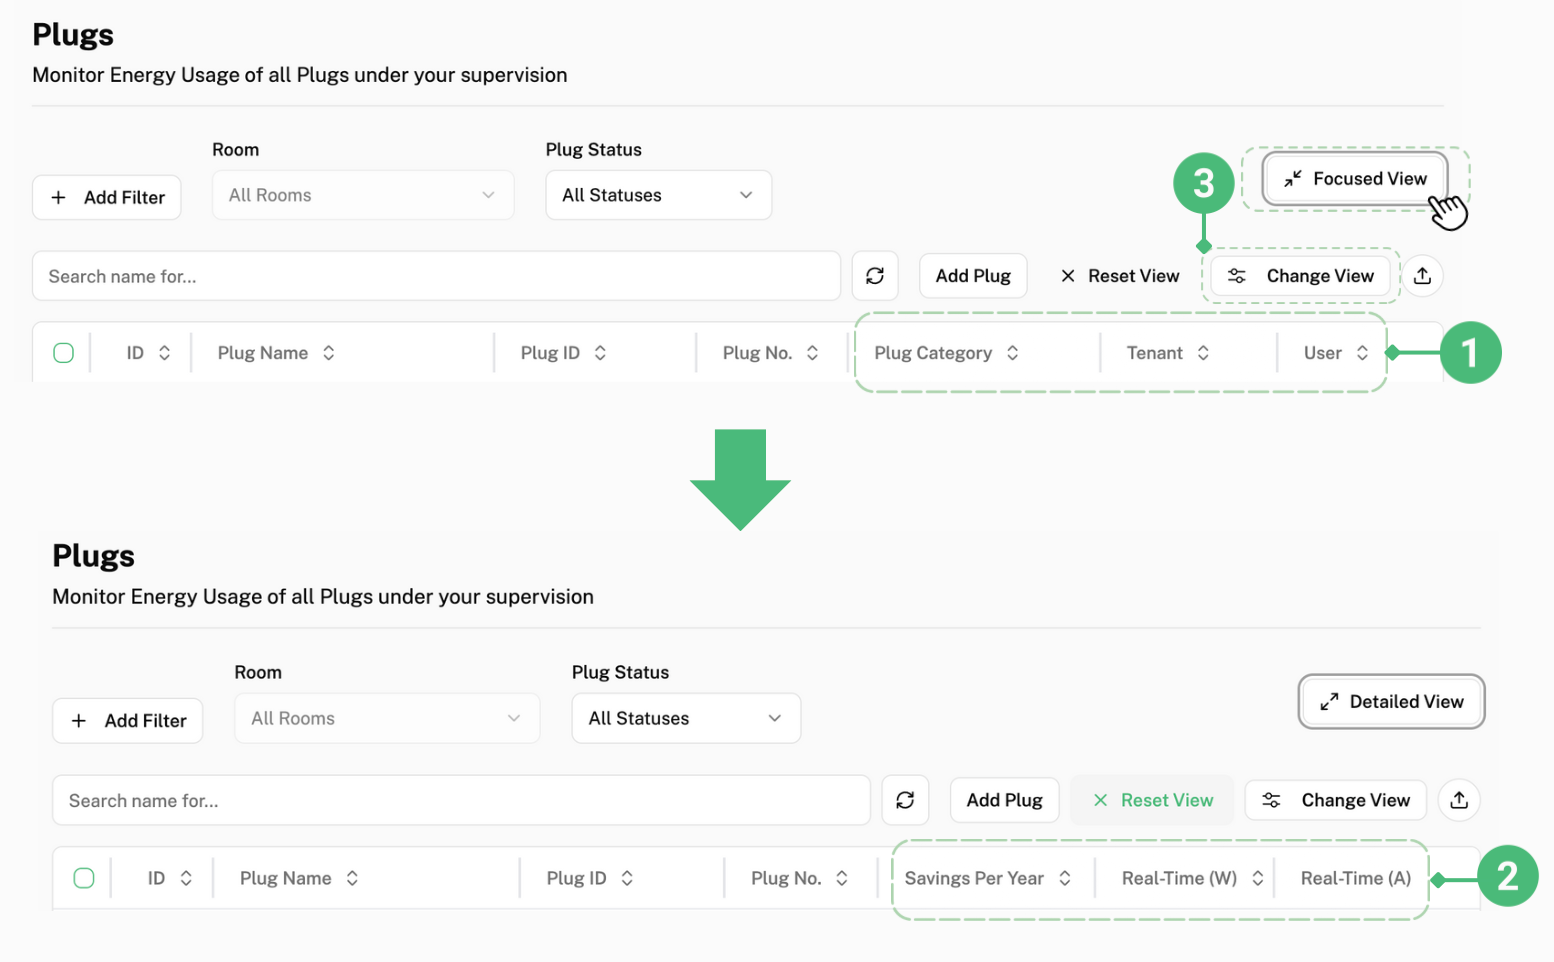
To get a detailed overview of the plugs, click “Focused View” as shown by the cursor below, this box will be changed to “Detailed View” and the headers of the overview will be changed from dotted box labelled 1, to the dotted box labelled 2.
Distribution Box
To access the distribution box, click "Distribution Box" found under "Smart Devices".
This is the page that will be displayed on your screen:
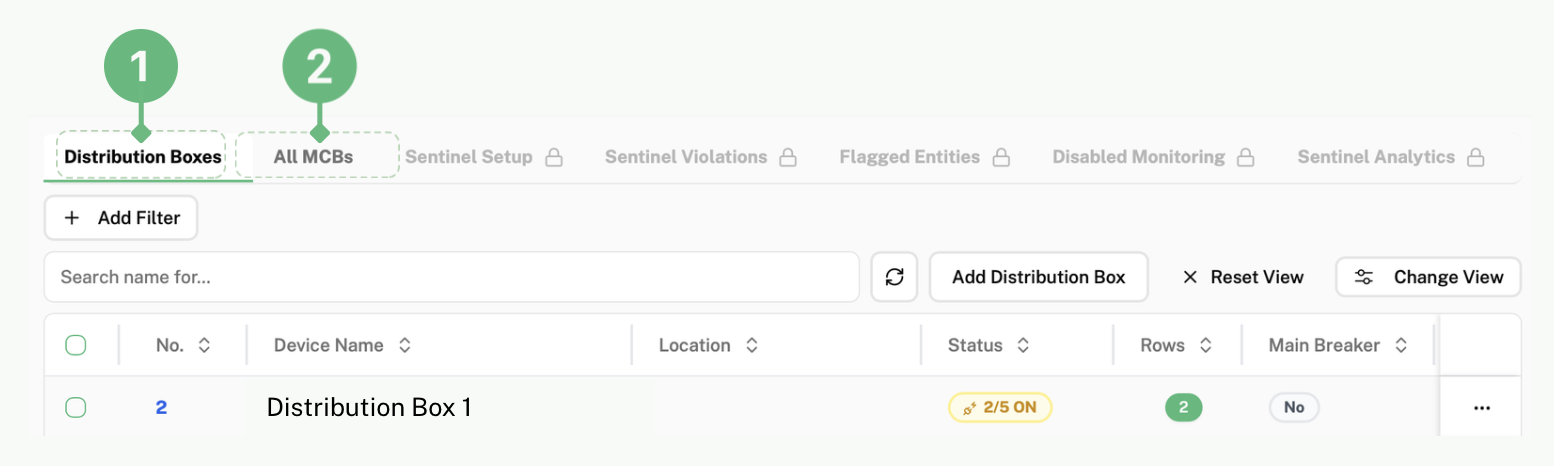
Click on 1 to view the different distribution boxes in your system.
Click on 2 to view all the different Miniature Circuit Breakers (MCB) across all of the distribution boxes in your system.
To learn how to carry out the following actions, you can refer to "Plugs" in the user manual (all steps are the same):
- To select and unselect distribution boards/MCBs
- To access the distribution board's dashboards/MCBs
- To edit the distribution boards/MCBs' information
How to View MCBs in a Specific Distribution Box
Click on the blue number (as shown below) next to the distribution box of the MCBs you want to view the information of.

Then, click on "Miniature Circuit Breakers" found at the top of the page.

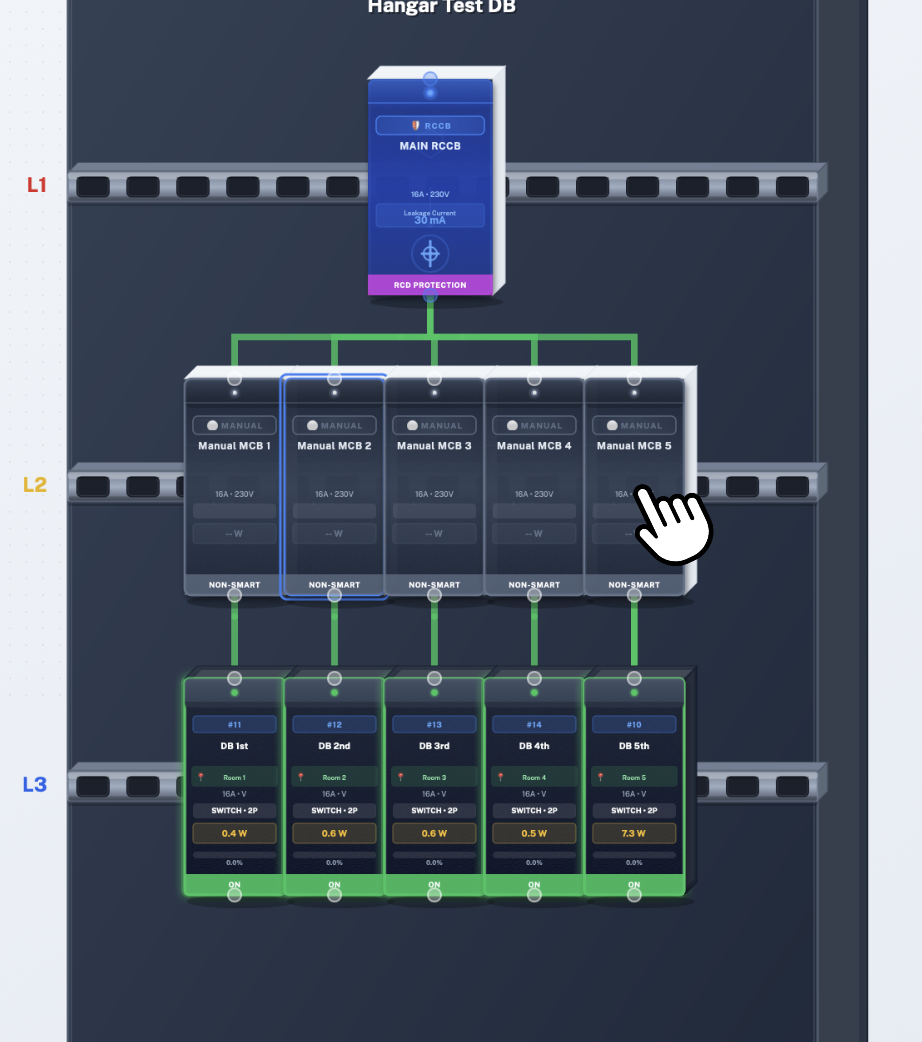
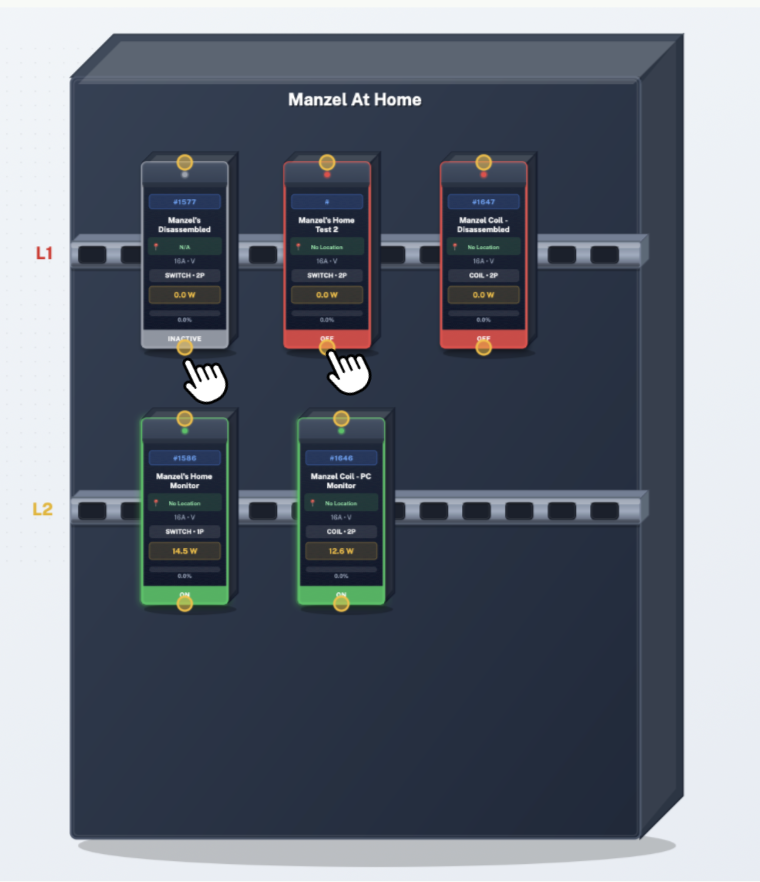
How to Create a "Digital Twin" of Your Distribution Box
A "Digital Twin" is a virtual version of your real life Distribution Box.
Click on the blue number (as shown below) next to the distribution box you want to create a digital twin of.
Then, click on "Digital Twin" found at the top of the page.

Your real, existing MCBs will already be in your distribution box as shown below (L3 Row). You CANNOT delete these MCBs.
The MCBs in green are the active smart sensors while the ones in grey are your manual "dumb" MCBs that are inactive.
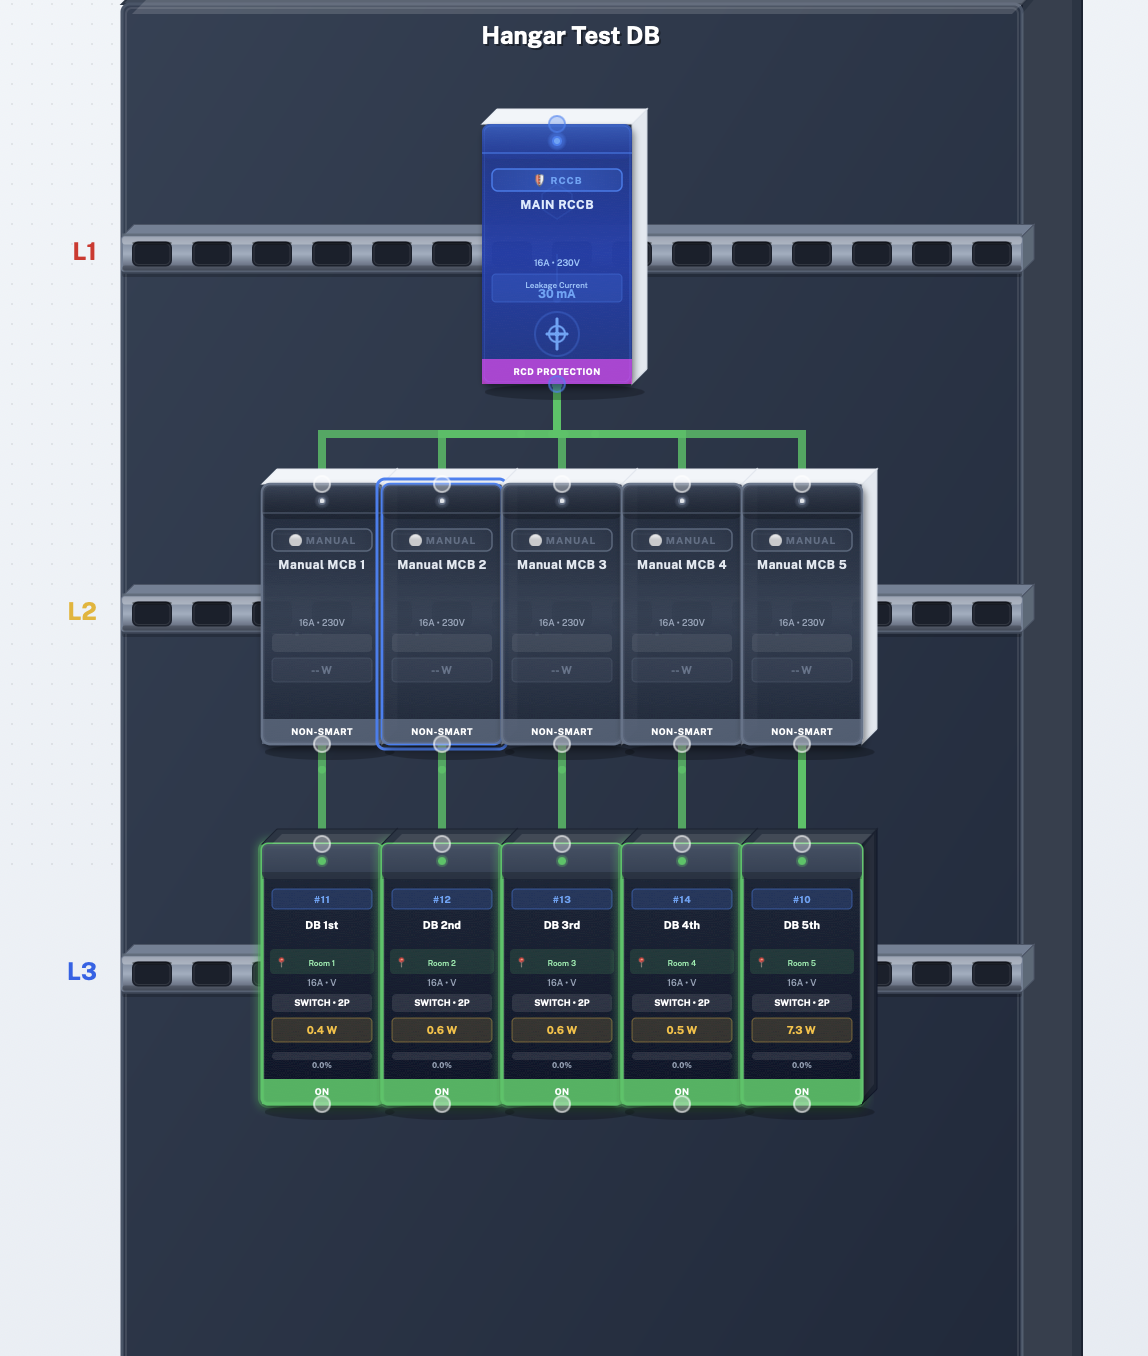
To activate the MCB, click on the MCB you want to activate.
This is the pop-up that will be displayed on your screen:
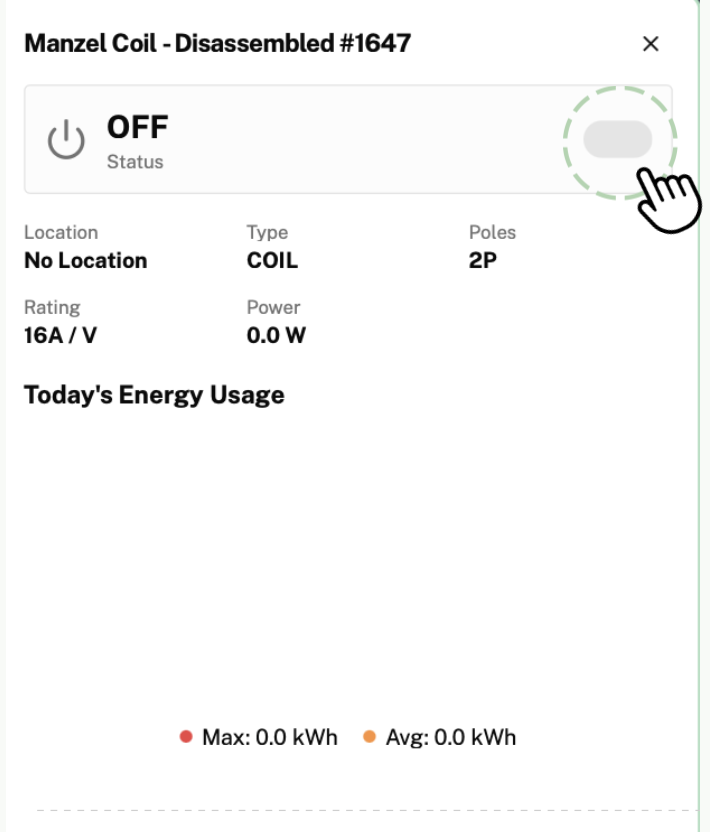
Click this button to turn on your MCB. Your MCB will then turn green, showing that it has been turned on and is activated.
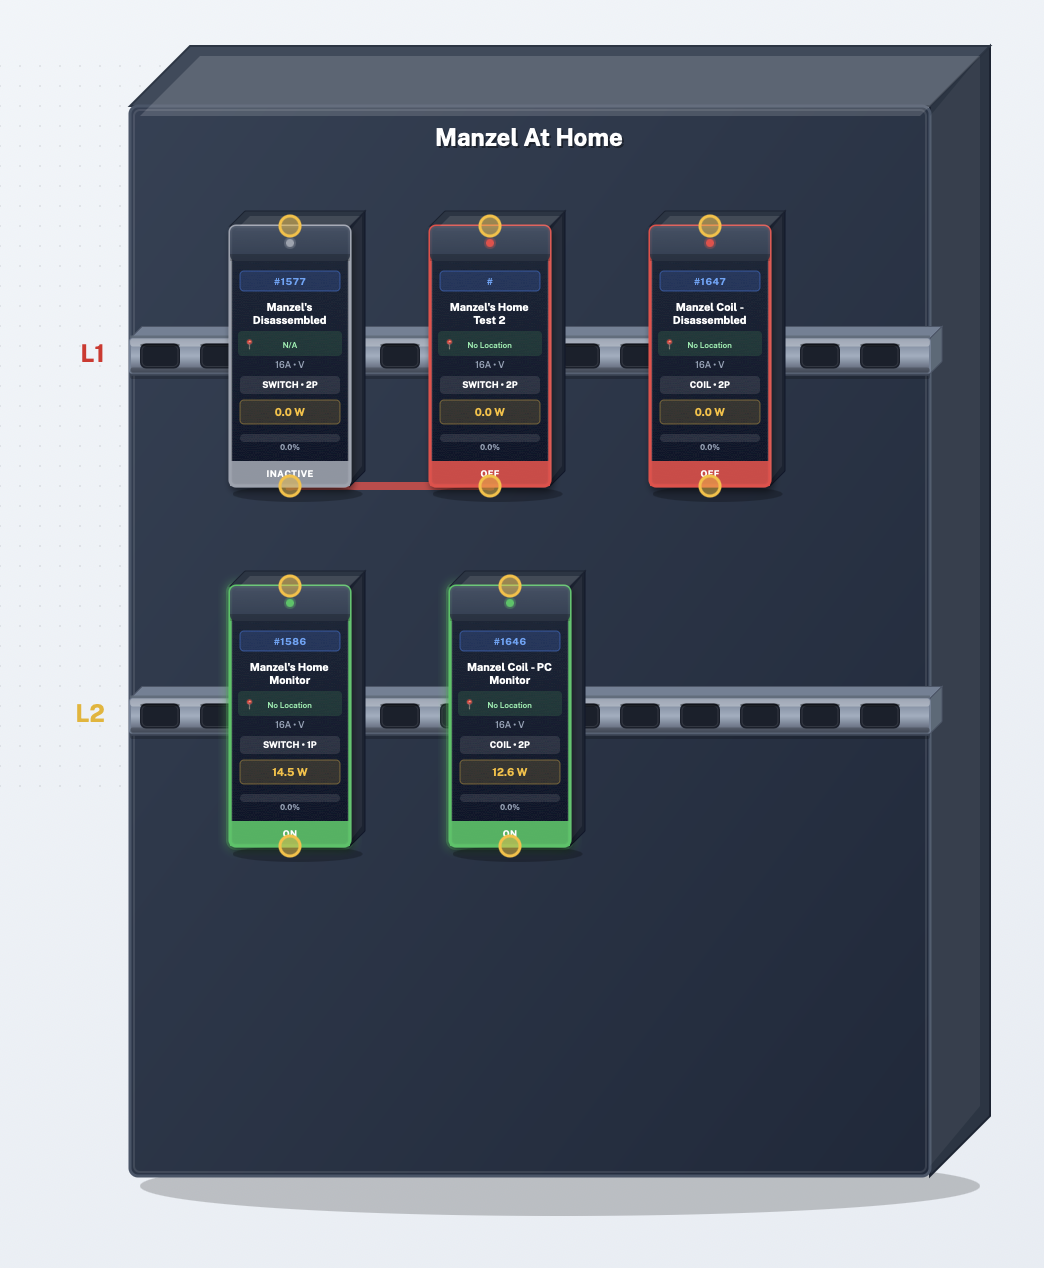
How to Customize Your Digital Twin
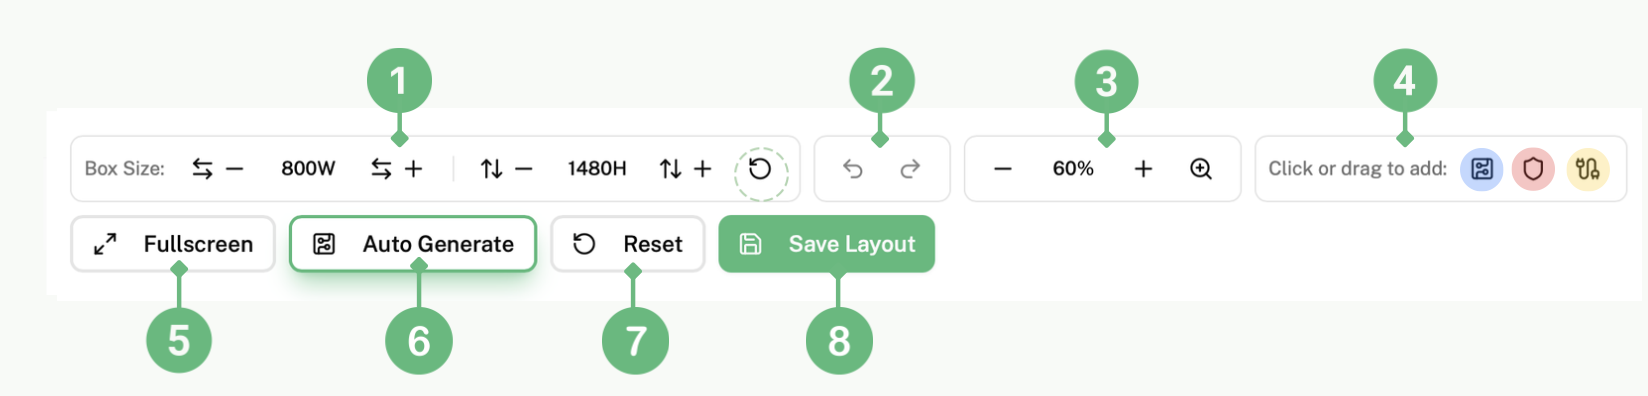
Click on the "-" and "+" icons on 1 to customize your digital twin to be the same size as your physical distribution box. Click on the arrow that's circled in green to reset the box to the default size.
Click on 2 to undo or redo your actions.
Click on the "-" and "+" icons on 3 to zoom out and in on your digital twin.
To edit your digital twin, click on the blue, red and yellow icons in the box labelled as 4
Click on the blue icon to add a Manual MCB (Non-Smart). Once you click the icon, this pop up will be displayed on your screen:
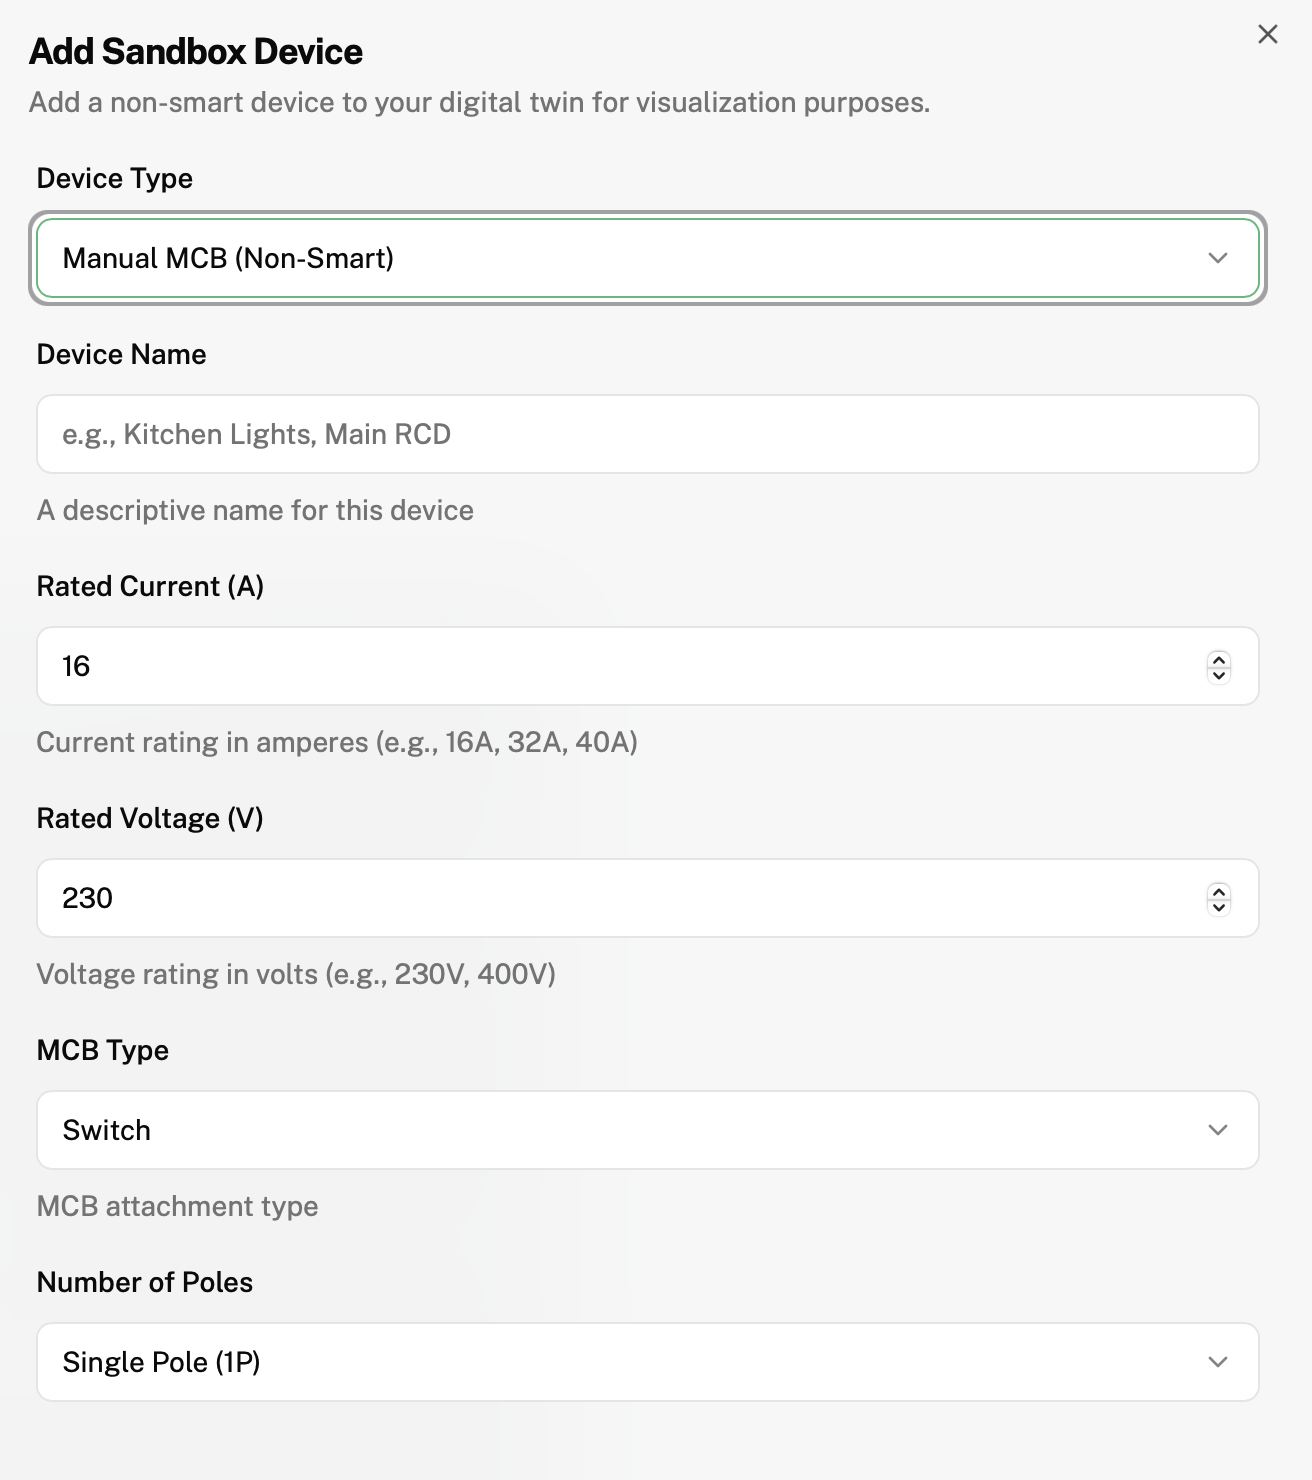
Fill in the information according to your physical MCBs.
Then scroll down and press "Add Device" to save the information and add the MCB into your digital twin
Click on the red icon to add a RCCB (Residual Current Circuit Breaker). Once you click the icon, this pop up will be displayed on your screen:
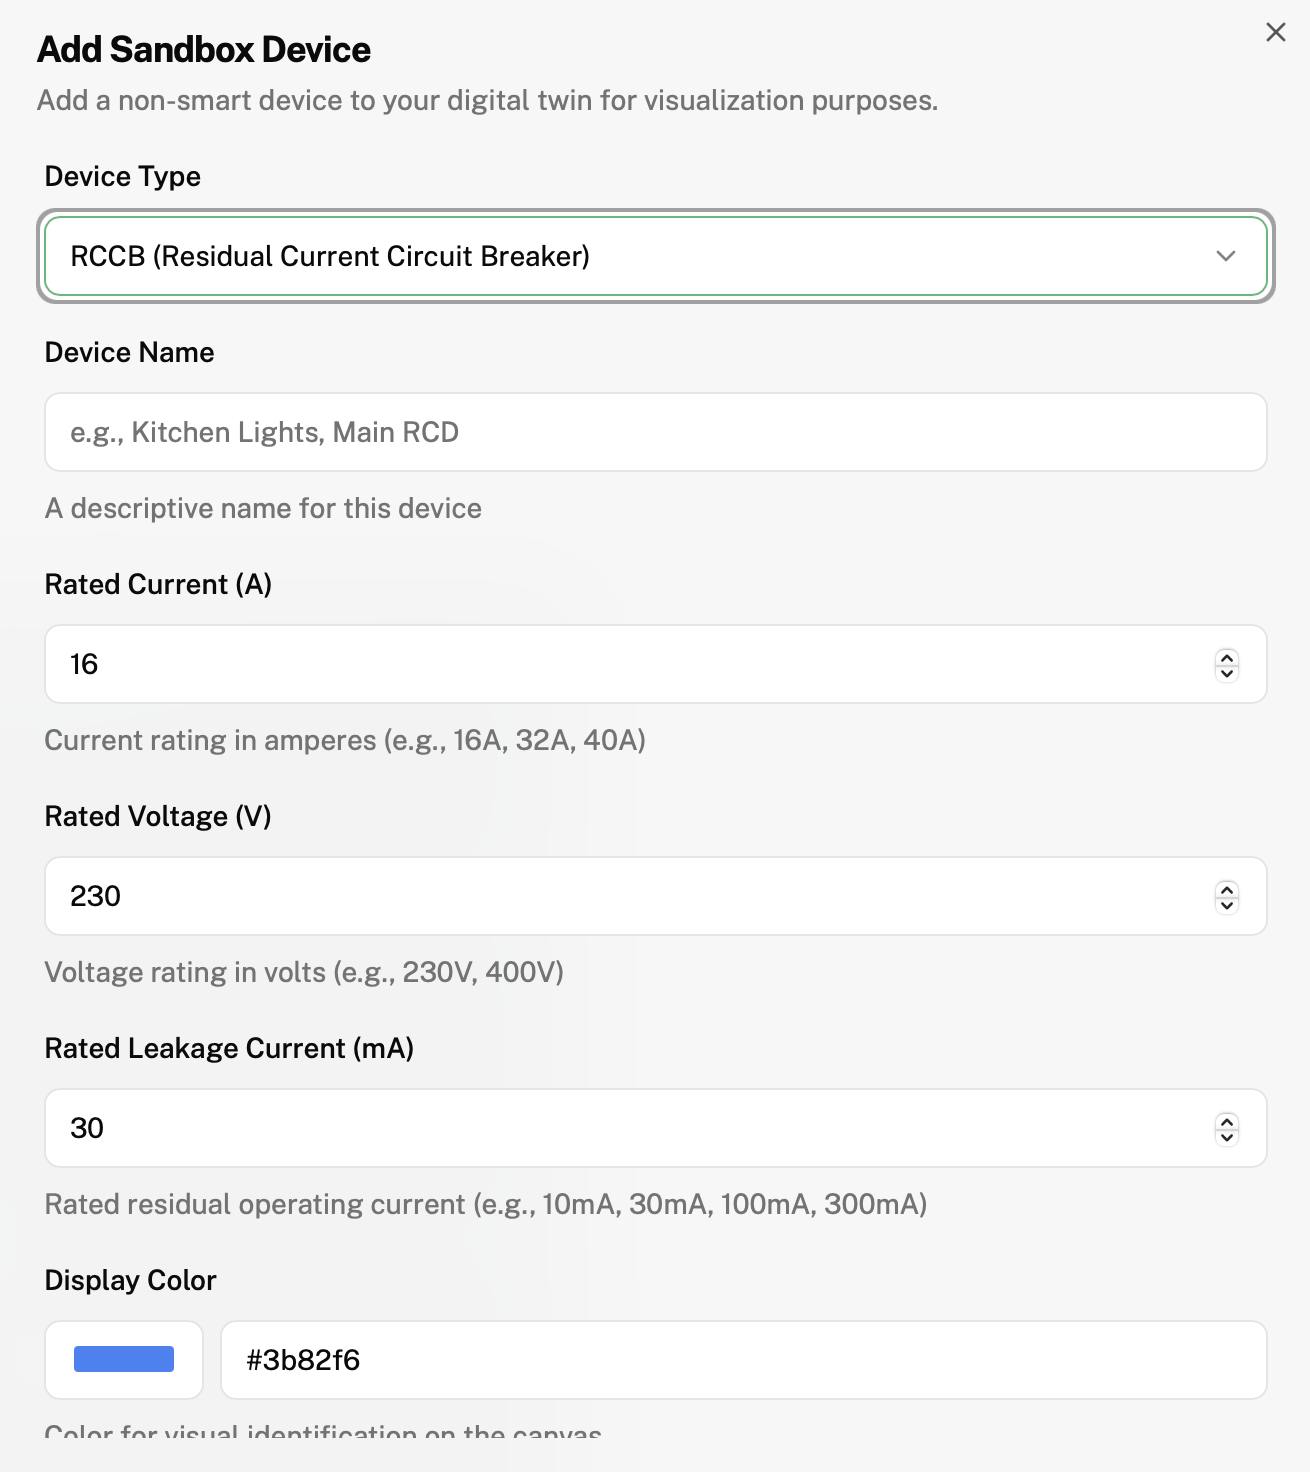
Fill in the information according to your physical RCCB
Then scroll down and press "Add Device" to save the information and add the RCCB into your digital twin
You can also drag and drop the MCB/RCCBs from their respective icons into the distribution box.
To move the MCB/RCCBs left and right or to another level, click onto the MCB/RCCB you want to move, and hold and drag the MCB/RCCB to your desired placement.
To edit the information of your MCB/RCCB, double click the MCB/RCCB you want to change the information of.
This is the pop-up that will be displayed on your screen:
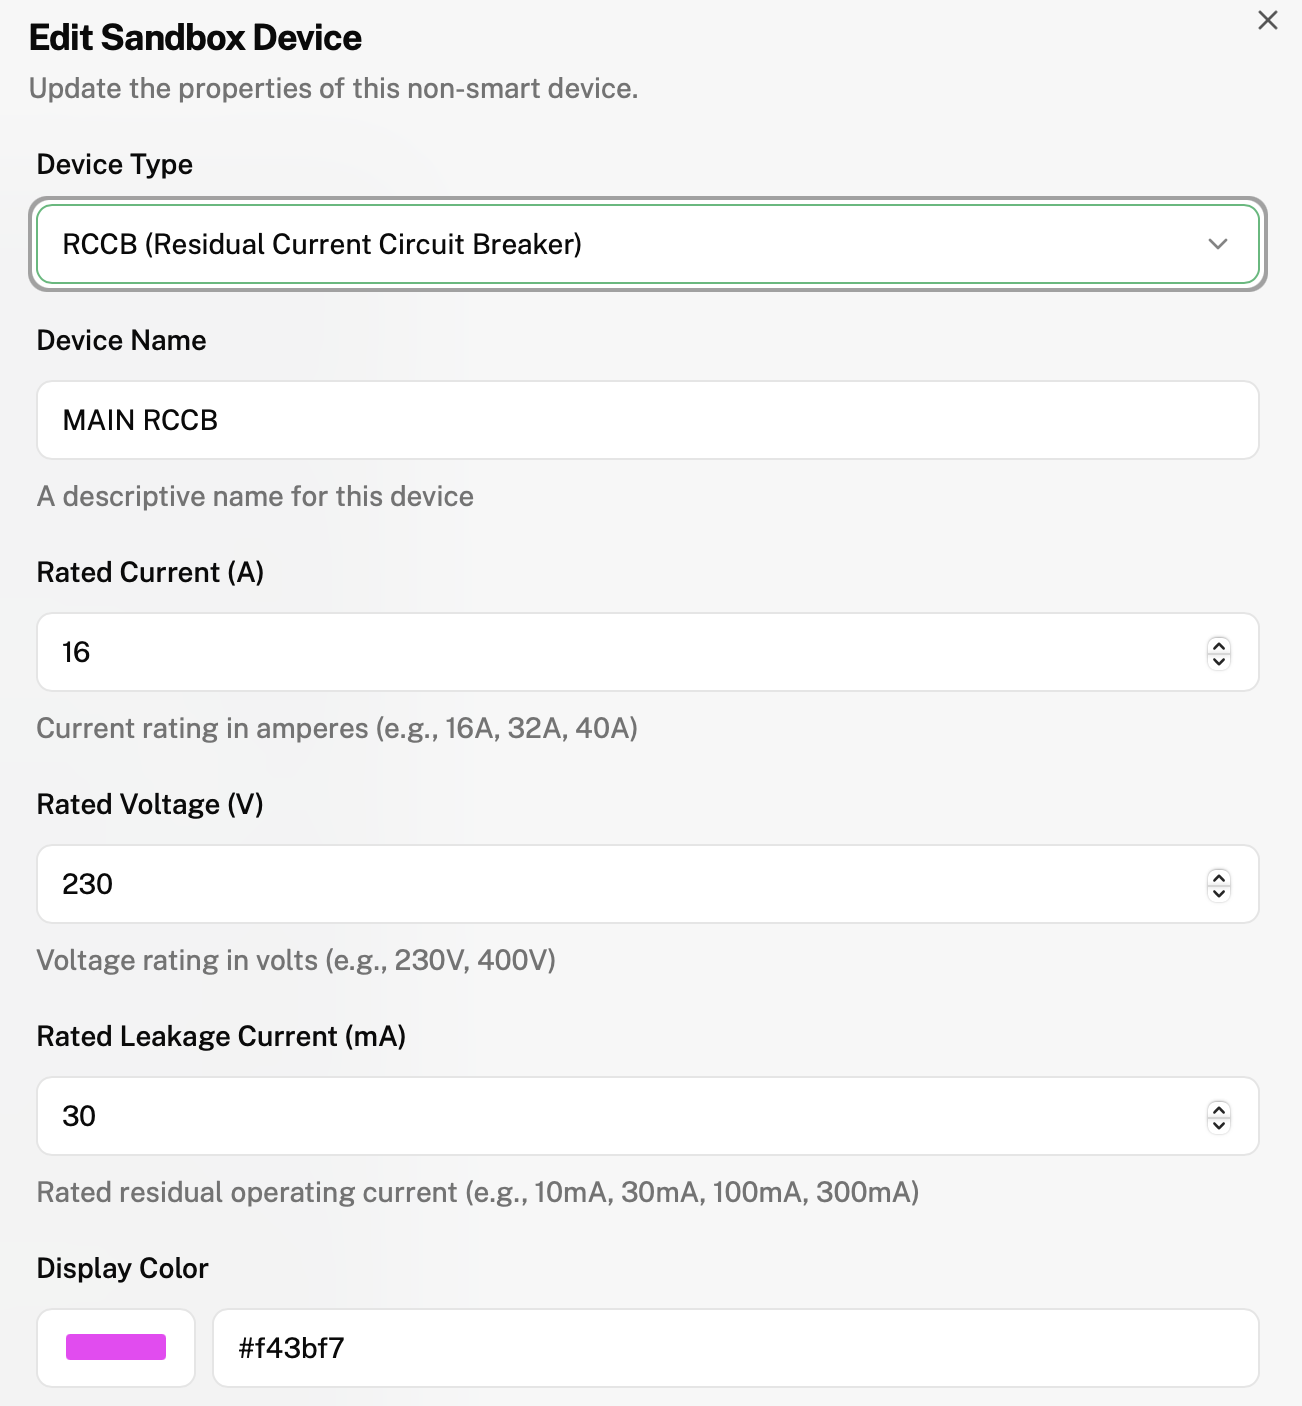
Then click "Update Device" and the new information will be updated and saved.
To delete the MCB/RCCB,
Click on the MCB/RCCB you want to delete.

Then click the trash bin on the top bar.
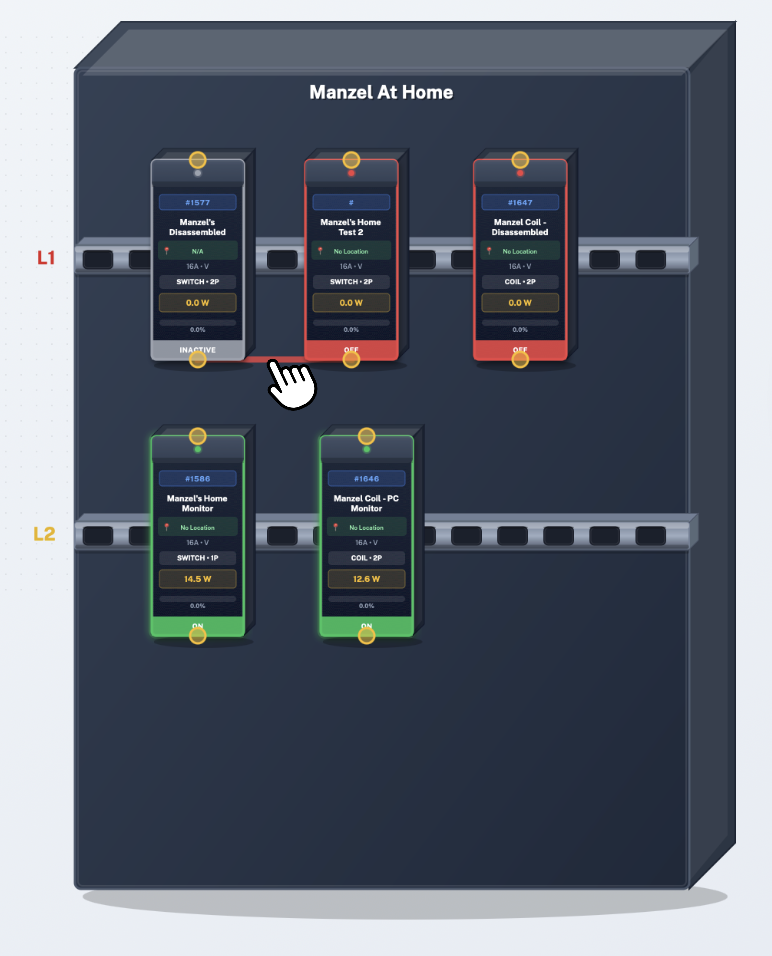
Click on the yellow icon to add wires to connect your MCB/RCCBs to each other.
After clicking on the icon, the dots on the MCB/RCCBs will turn yellow
Click on the yellow dot of the first MCB/RCCB you would like to connect, then click the other MCB/RCCB you would like to connect to it.
The wire will show up as shown on the left.
To delete the wire, click on it.
Then click the trash bin on the top bar.
Click on 5 to view your digital twin on the full screen.
Click on 6 to generate a baseline digital twin, and edit it accordingly.
Click on 7 to reset your digital twin to its original layout.
Click on 8 to save your current layout, if you do not do this step your progress will NOT be saved. (you MUST click on 8 after clicking on 6 if you would like the automatically generated digital twin to be saved)
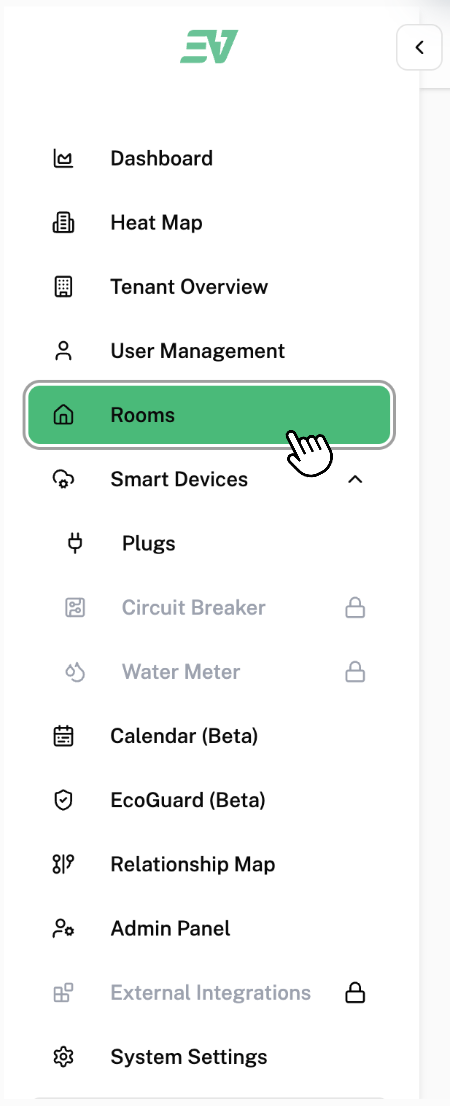
Rooms
How to Add a Room
To access rooms, click on “Rooms” found in the side bar.
This is the page that will be displayed on your screen:
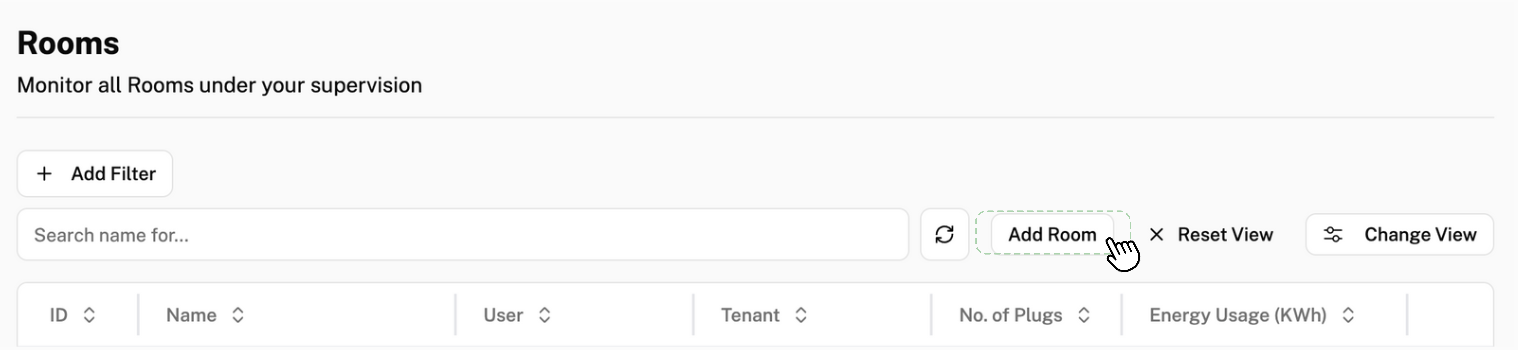
To add rooms, click “Add Room”.
This is the pop-up that will be displayed on your screen:
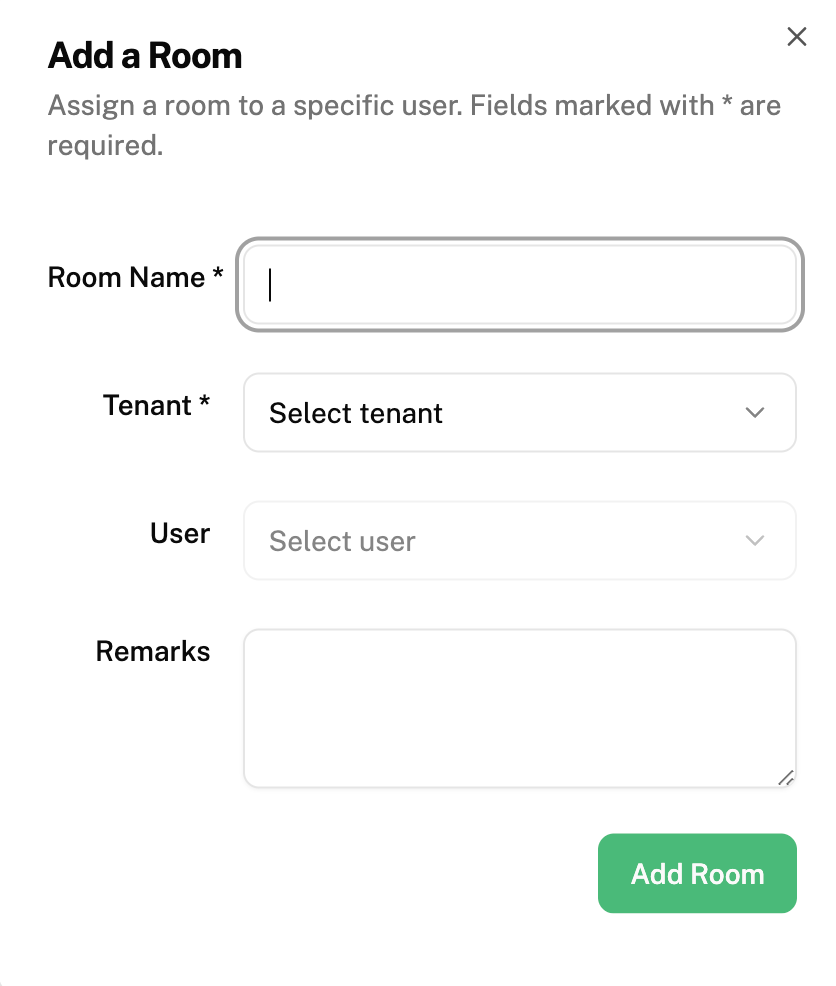
“Room Name” fill in the name of the room your plug(s) are found in
Click on “Tenant” and select the tenant this room is under (Which branch can this plug and its respective room be found in)
”Zone” can be left empty for now
“Remarks” are optional
Click “Add Room” to confirm this change and save it in software
Admins
How to Add an Admin
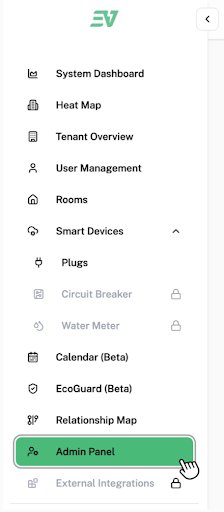
To access the Admin Panel, click on "Admin Panel" found in the side bar.
This is the page that will be displayed on your screen:

To add an admin, click "Add Admin".
This is the pop-up that will be displayed on your screen:
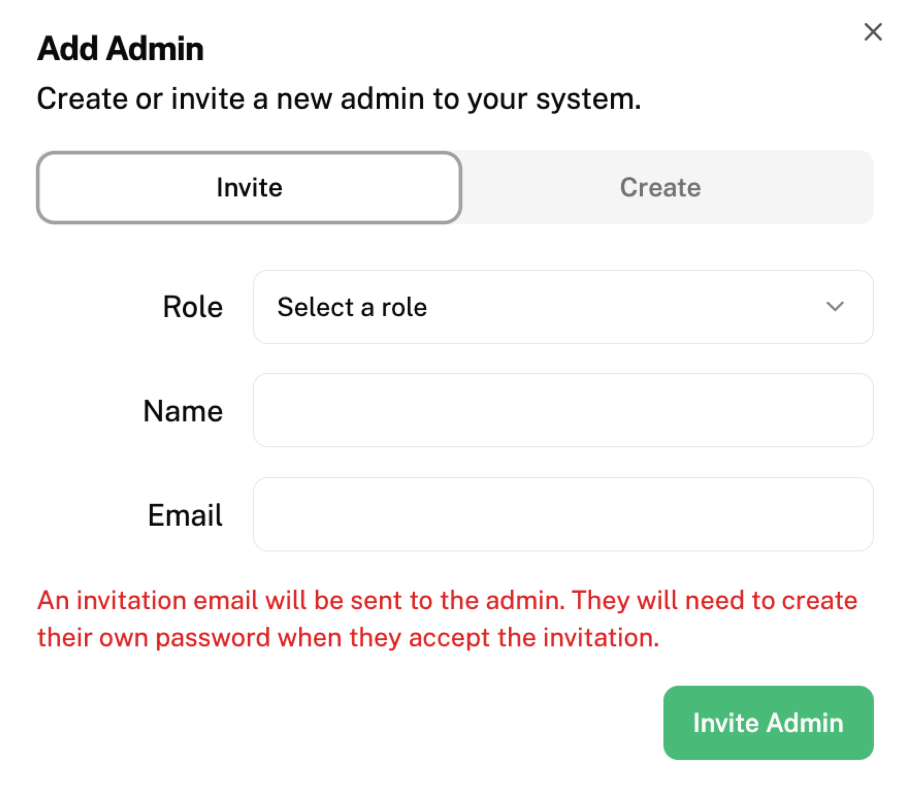
Click on "Role" and select the role you want to assign this new admin
"Name" fill in the new admin's name
"Email" fill in the new admin's email
Click "Invite Admin" to send an invitation email to this new admin
Calendar
How to Add a Schedule for a Specific Date
Watch the demo videos:
- Calendar Integration — connect Google or Microsoft calendar to Everest
- Calendar Exclusions — set up off days and public holidays
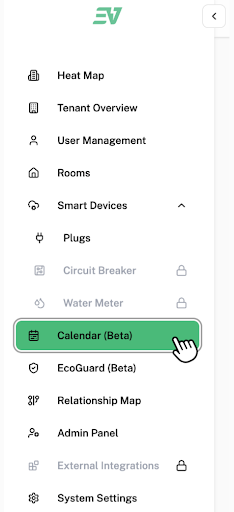
Click on ”Calendar (Beta)” found in the side bar.
This is the page that will be displayed on your screen:
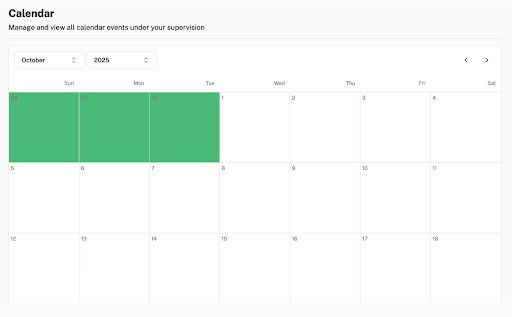
To add a schedule for a specific date, click on the box of the date you want to add a schedule to.
This is the pop-up that will be displayed on your screen:
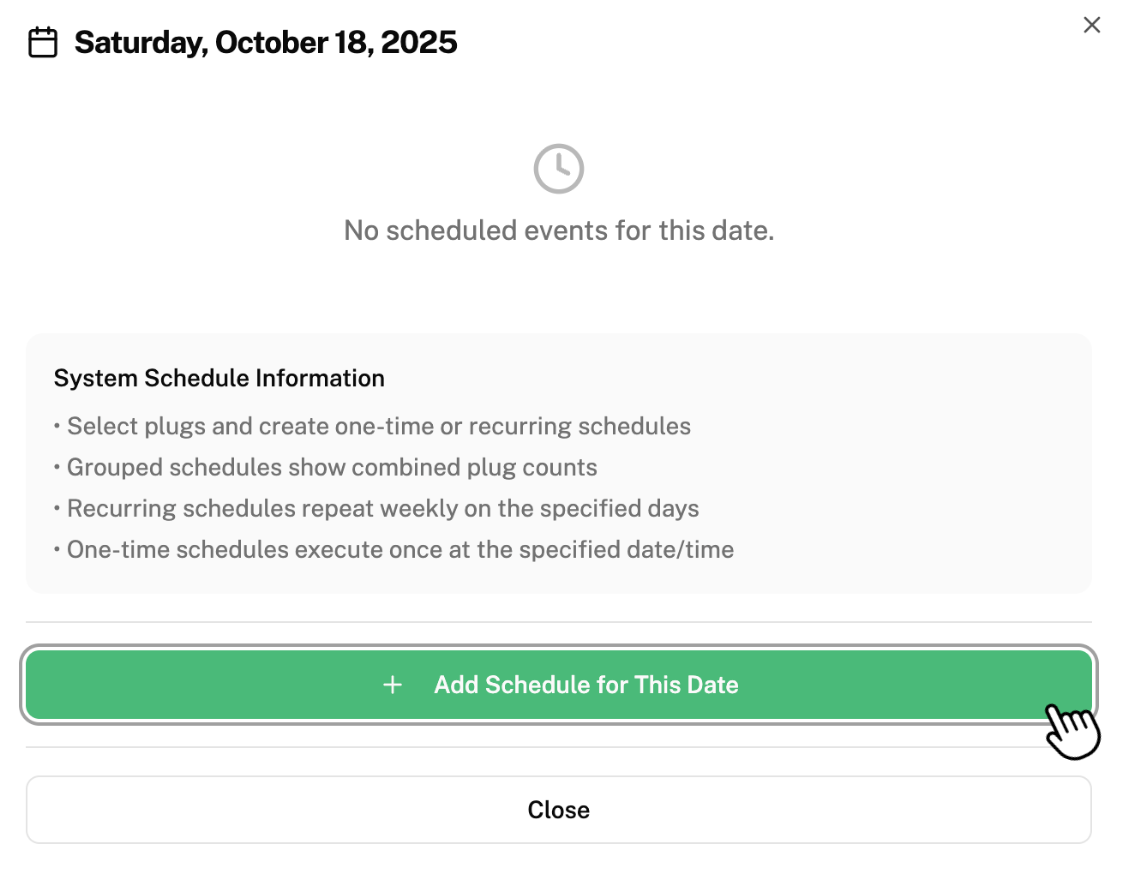
Click on “Add Schedule for This Date”.
This is the pop-up that will be displayed on your screen:
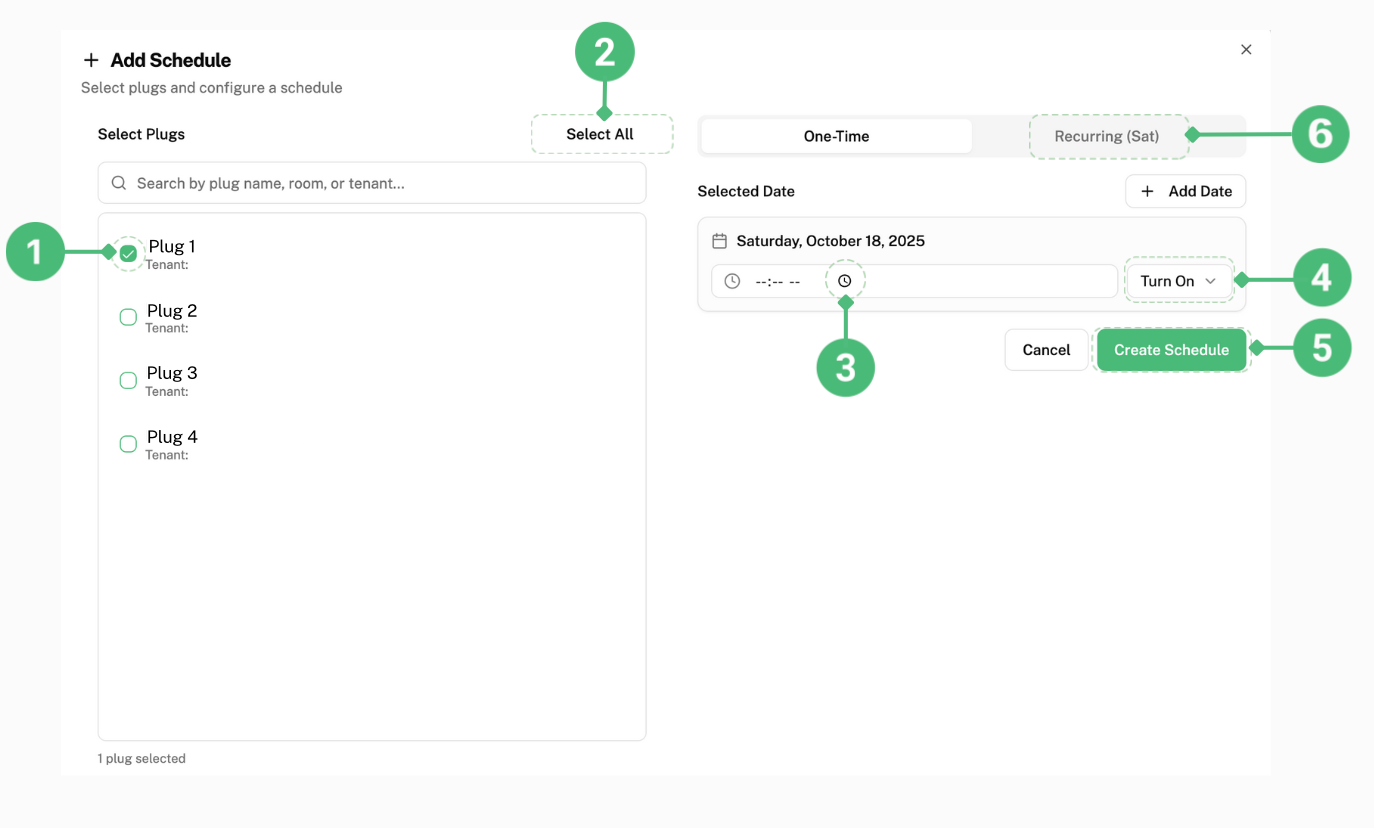
To individually select the plug you want to set a schedule on this date, click the small box next to it labelled as 1.
To set a schedule for all the plugs in your system on this date, click on “Select All” labelled as 2.
To set a time, click on the clock symbol labelled as 3.
This pop-up will be displayed:
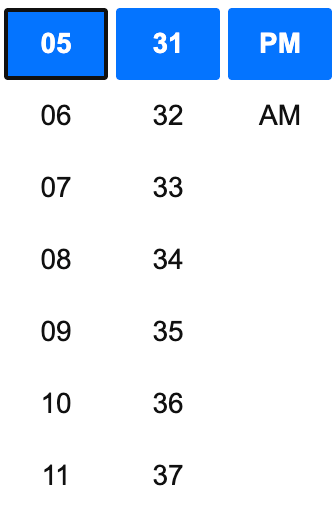
Select the time you want your plug(s) to turn on or off.
Click on “Turn On” labelled as 4 and select whether you want your plug(s) to turn off or on for the time you have set.
Click on “Create Schedule” labelled as 5 to save this schedule in your system.
Multiple schedules can be added on the same day.
To add a schedule that recurs every week, click “Recurring” labelled as 6 and repeat the same steps as mentioned above.
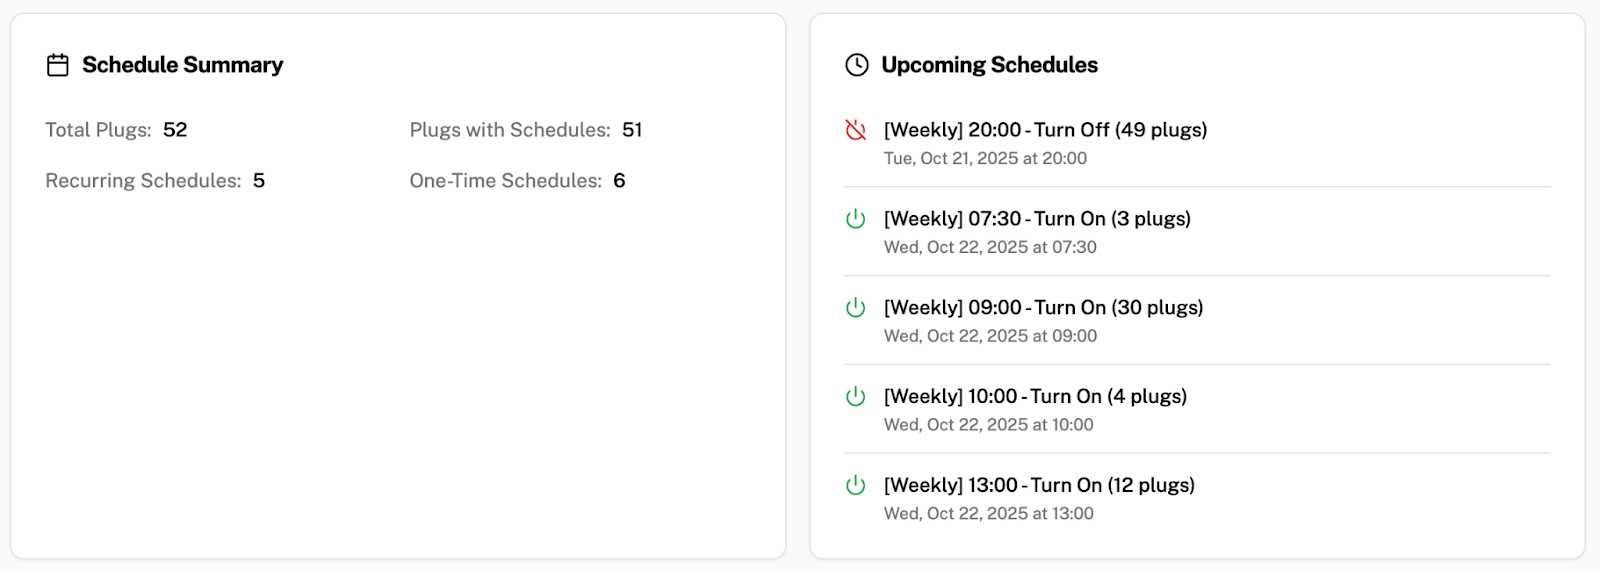
How to View a Summary of All the Schedules
To get a summary of all the schedules you set, scroll to the bottom of the page. This is an example of what you will see:
How to Add Exclusions in Your Calendar
Watch the Calendar Exclusions demo video for a walkthrough of this feature.
An exclusion is when your company has an off day or holiday (e.g. Sports day, Retreats), when no one will be in the office. You can add these dates into your calendar so that your appliances will be turned off during these times.
Click on "Manage Exclusions" on the top of your calendar.

This is the pop-up that will be displayed on your screen:
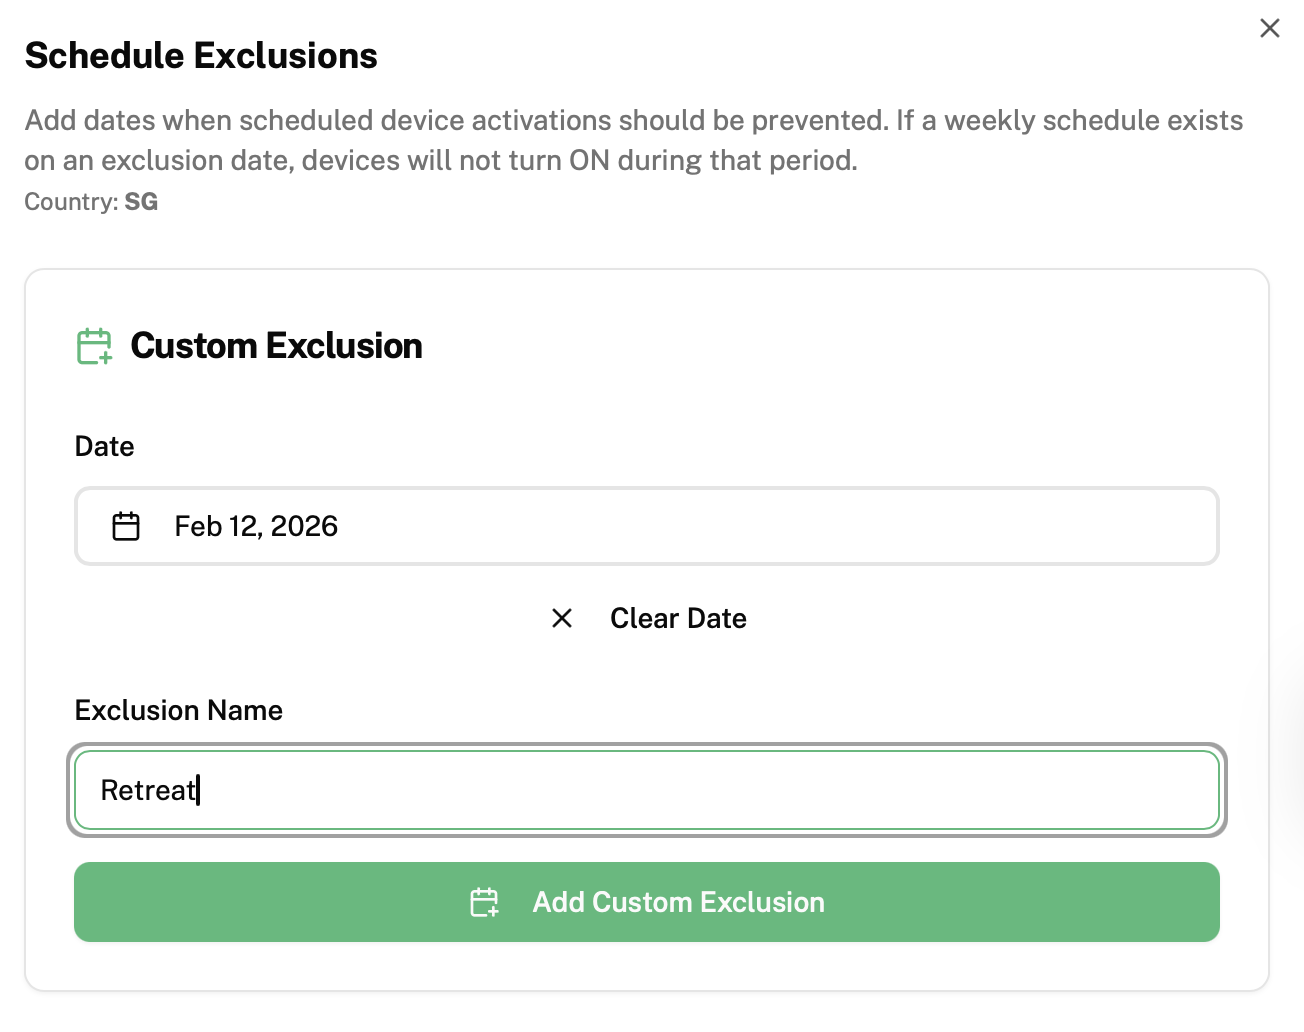
Click on the box under "Date". If your exclusion is one day, click on the date when the exclusion is taking place. If your exclusion is a few days, click on the date when your exclusion starts and the date when it ends.
"Exclusion Name" fill in the name of your company's exclusion (e.g. Retreat)
Click "Add Custom Exclusion" to save the information of this exclusion and add it into your calendar
Your exclusion should be shown and labeled in your calendar as shown below:

How to Add Public Holidays
If you would like to include the public holidays in Singapore:
- Click on "Manage Exclusions" on the top of your calendar
- Scroll down until you see "Public Holidays"
- Click on "Fetch Public Holidays for SG"
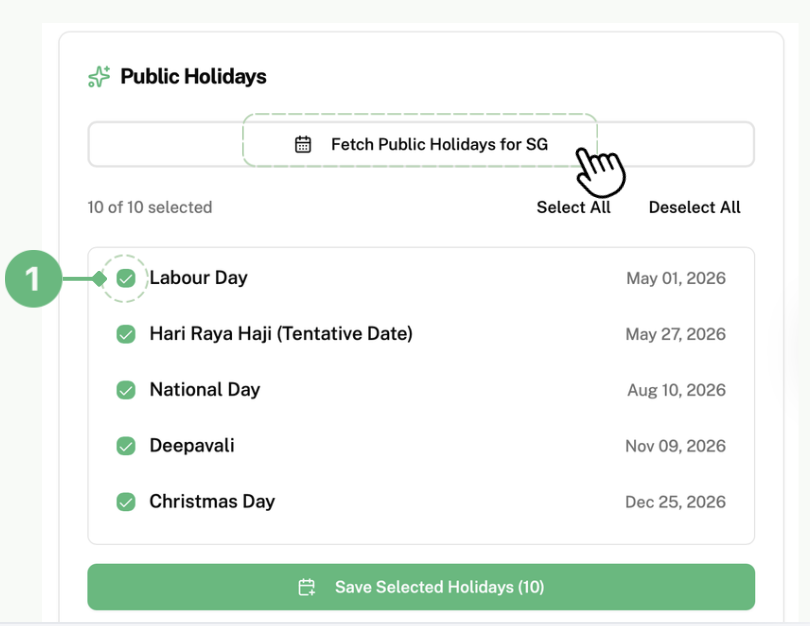
Everest will help you generate all the public holidays in Singapore in a year. If your company does not take a break on a specific public holiday, you can unselect that holiday by clicking the icon next to that holiday as labelled as 1.
Click on "Save Selected Holidays" to save your holidays in your calendar.
How to View and Delete Exclusions
To view the summary of all your exclusions:
- Click on "Manage Exclusions" on the top of your calendar
- Scroll down until you see "Current Exclusions"
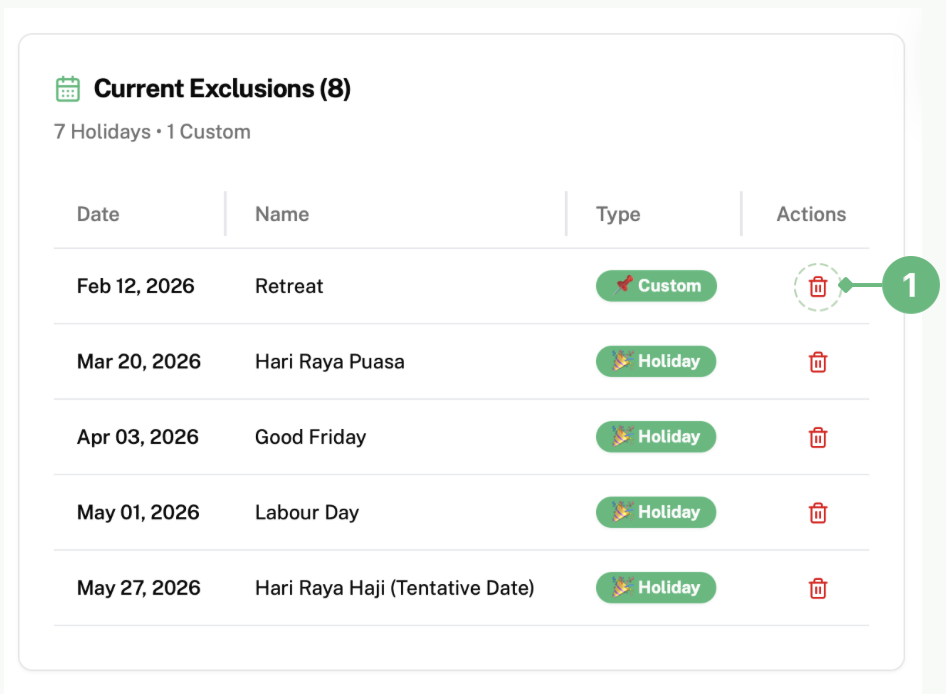
To delete any exclusion or holiday, click on the bin icon next to that exclusion or holiday as labelled as 1.